
Fiddlesticks, what to use for a bow? Up until this point, all we’ve made is a plucked psaltery; but we want to be able to bow it in order to bring out the full potential of this instrument’s amazing sound. There are a few bow choices available for those who play the bowed psaltery, but unlike the violin, there is certainly no standardized shape or size.
When compared to bows for other bowed instruments, a psaltery’s bow is typically smaller and lighter: mainly because the playing style is much different than a violin, cello, etc. On a bowed psaltery, there is much more up and down movement required, rather than the lateral strokes seen on a violin. Because you must be continually moving the bow up and down the length of the psaltery, (also requiring you to extend your arm out farther), a much shorter and lighter bow is used for more agility. More details on this can be found in the playing section.
Basically, all the bows used fall into two categories: store-bought violin bows, and homemade. Both are capable of bringing out the beautiful and haunting sound of the bowed psaltery; a lot of it boils down to your needs and personal preference. I’ll discuss both options below.
Fractional sized violin bows:
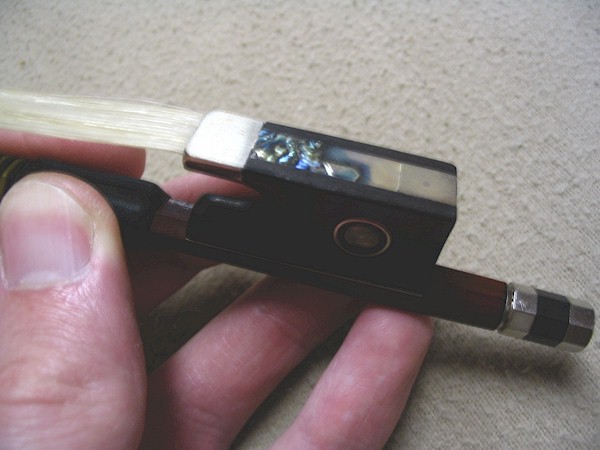
Fractional sized violin bows are basically bows that were meant to be played on a violin, but are used on a bowed psaltery. A standard violin is called a 4/4 size violin, and accordingly, a full size violin bow is referred to as a 4/4 bow. Most find this full-sized bow, at nearly 30 inches in length, to be far too cumbersome and heavy to use on a bowed psaltery. Instead, what can be used instead is a bow meant for a fractional sized violin.
There are several sizes of fractional violin bows, ranging from 3/4 down to 1/16. (These fractional sizes are not literal: that is, a 1/4 violin bow is not one fourth the size of a 4/4 bow.) They all have the same sized frog at the end, but each bow gets progressively shorter overall. I’ve also noticed a little bit of variation between bow lengths, even among those that are supposed to be the same size. Here’s a brief table estimating the standard sizes and what I have actually encountered:
| Bow Size | Bow Length |
| 4/4 | ~ 29 to 30 inches |
| 3/4 | ~ 27 inches |
| 1/2 | ~ 24 to 25 inches |
| 1/4 | ~ 21 to 22 inches |
| 1/8 | ~ 19 to 20 inches |
| 1/16 | ~ 17 to 18 inches |
Personally, I use a 1/16 size violin bow. Some people like the bow to be slightly longer, going up to a 1/8 or 1/4 size bow. In special cases, even larger sizes are used when very long notes need to be played.
There are a lot of advantages to using a fractional sized violin bow, and a few disadvantages too. The main advantage is that the violin bow is the result of hundreds of years of refinement in bow making, and in my opinion, gives the best overall sound.
(If you are at all interested in learning about bows and how they have changed over the years, I highly recommend tracking down an out-of-print book through your local library, called “The bow, its history, manufacture, and use” by Henry Saint-George. It is incredibly interesting reading – at least it was for me!)
The hairs on a violin bow are arranged flat so that a lot more hair makes contact with the string, resulting in a fuller, more even sound. To be honest, in a lot of cases you can barely hear a difference between a violin bow and a homemade bow, but under certain circumstances and on some notes, the extra hairs can reduce the scratchiness of the sound that is sometimes heard. Because of this, it also seems to give more consistent results and can compensate for shortcomings in playing technique.
Think of a homemade bow, with its round cord of hair, as a solo singer, or a duet or trio – only a few hairs are contacting the string, so the sound is more focused, but it’s not as full. (This is not necessarily a bad thing.) But, if one of those voices falters somehow, (by hitting the string in the wrong way somehow), it will be quite noticeable. Now, think of a violin bow as a larger chorus of voices – a broader band of hair is contacting the string, so it sounds fuller and more blended. If a few voices falter, you can hardly notice because the other voices are still heard. This is the best way I can describe the sound difference between the two bows, and why I prefer the predictability of a violin bow.
Additionally, a violin bow has an adjustable frog, (the piece that holds the hair at the base of the bow), that allows you to adjust the tension of the hair by turning a knob on the end of the bow. This lets you compensate for playing in different environments and humidity levels, and also prolongs the life of the hair and the bow.
Now, for the downsides of using a violin bow: primarily, there is the cost. Seeing as how a homemade bow is almost free, violin bows are considerably more expensive! And because of the odd sizes required, it may also be more difficult to find one. However, eBay usually has sellers with smaller bow sizes available for anywhere between $20 and $30 shipped. They are, of course, of all different levels of quality, some I have found to be quite good, and some to be junky.
The second disadvantage is that a violin bow looks a little boring. For period musicians and re-enactments, etc. a violin bow might look a bit too modern. I guess I also like to have everything match too—such as having a matching Kwila bow for the Redwood/Kwila bowed psaltery I built for this project.
One last disadvantage, (though rather insignificant), is that due to the width of the violin bow’s band of hair, the bow might be unable to get in between the pins on some smaller psalteries. (Obviously the one that we built has the pins spaced far enough apart to allow a violin bow to comfortably pass between the hitch pins.) This is only problematic when the hitch pins have been crammed down to almost 3/8″ between pins, which is rare.
For me, the determining factor in choosing a violin bow was based on sound. Because of the orientation of the hairs, (a flat ribbon), I find it gives a full, predictable sound. Now, before you write off making a bow yourself, let’s move on to the next section and hear the other side of the case!
Homemade bows:
Chances are, a homemade bow will be entirely sufficient for making music. A lot of it boils down to personal preference and getting used to the bow itself. It’s like driving an automatic transmission versus a manual. (Automatic only for me, thank you!) If you play either kind of bow for long enough, you will be able to get good sound out of it; and simply out of habit you may never want to switch to another type of bow.
The main advantage to a homemade bow is cost and simplicity. You can probably make the actual wood part of the bow simply from the scraps leftover from the wood of the psaltery’s frame. After that, all you need is some bow hair and you’re done. (You will also need some rosin, but this is needed for both types of bows regardless.)
The reason why we don’t just make a violin-type bow is that they are rather difficult to make – especially for a first attempt. They require precisely graduating the stick, giving it a camber with an alcohol lamp, along with making the tiny parts for the frog and the angled mortise blocks (usually left unglued to make re-hairing easier) for keeping the hair in place on both ends.
With a homemade bow, we have complete freedom to make the bow in whatever shape we want – within reason, of course. Some people prefer to include a wider end to function as a handle, while others make a completely symmetrical bow that can be held from either end – similar to a traditional style archery bow. In the plans below, I will leave the final shape up to you, but give some suggestions to help you along. (You can also take a look at some of the bows that others have made in the online gallery of psalteries.)
The main disadvantage, as I seen it, with these homemade bows is that the hair is formed into a round cord and tied off into knots on both ends. Because of how the hair is shaped, not as many hairs contact the string, so the resulting sound can be thinner than a violin bow. An upside to this is that you may be able to jet around a little faster on the strings with a round cord of hair versus a flat ribbon.
The second disadvantage is the fact that the hair of the bow is fixed, and always under tension. While I haven’t had any problems because of this yet, it must affect the longevity of the bow. I’ve noticed in one bow I made several months ago that the tension on the hair is noticeably less than when I first made it. I’m not sure if this is a result of a change in humidity and environment, or if the ends of the wood are slowly being pulled together under the hair’s tension. It’s nice to be able to adjust the hair to the exact tension that you want.
If this is your first bowed psaltery, I would recommend at least making yourself one or two bows – they’re incredibly easy to make. Actually, if you find that you really like playing the bowed psaltery, I’d recommend trying both types of bows: a violin bow and a homemade one, and see which one you like the best.
Making a Bow:
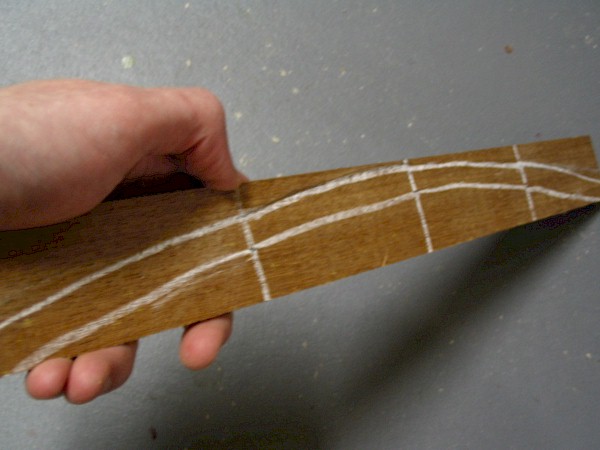
The first step in making your own bow is beginning with a bow blank. The blank is a section of wood that we will use to cut out the pattern of a bow. You can use scraps leftover from the wood of the frame of your psaltery, or any other strong hardwood. For stability’s sake, I’d also recommend using wood that is quartersawn, though this is not absolutely essential. (If you read the discussion on quartersawn soundboards, you may know why this is the case.) Fortunately, the Kwila that I used for the psaltery and bow were both quartersawn. (Through no intentional choosing of my own!)
Shown below is the size of the blank that I used, which will give you a bow about 16 inches long. You are free to alter the length if you want a bow that is slightly longer or shorter.

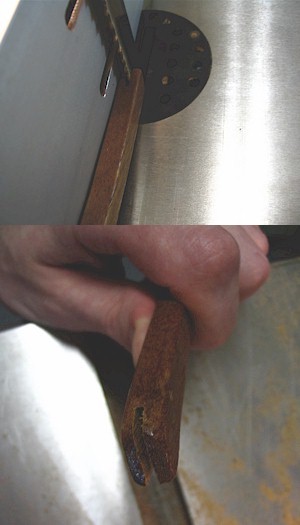
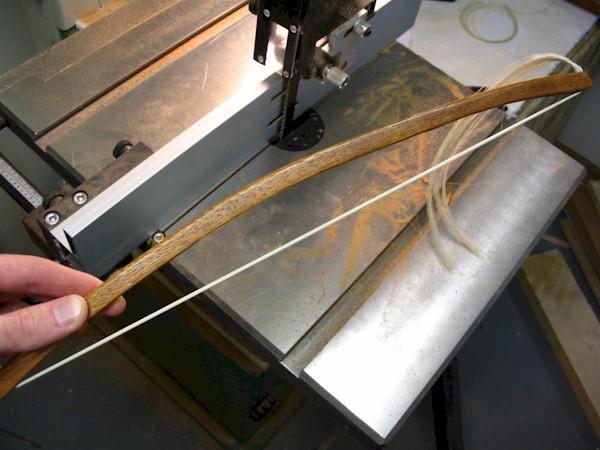
Once you have cut the blank to the right dimensions, decide what you want the bow to look like when it’s done, and draw the pattern out on the blank. Then, use a bandsaw or scroll saw to remove the majority of the waste from the blank. In the spirit of experimentation, I decided to make a symmetrical bow this time, as I’ve never tried this shape before. Here’s a photo of my blank, with a rough drawing of the bow on the side, which was later refined. (Yeah, I know it looks like a kindergartener drew it, but I used chalk so that it would be visible in the photo.)
Once you have the bow in its rough state, you can use various tools to chisel, plane, sand, scrape, rasp, etc. a more refined look to the bow. Sharp 90 angles aren’t very comfortable to hold, so try to fit the bow to your hand and make it comfortable.
Once the bow is fully shaped and smooth, we have to make a thin cut in each end of the bow to hold the horsehair. I use a bandsaw for this, but any saw with a thin kerf, like a handsaw, will do fine. (I wouldn’t use a regular tablesaw blade for this because the blades are usually too thick, and being that the bow is already only 3/8″ thick, it won’t leave much wood on either side of the slot.)
Before you add the hair, this may be a good time to finish the bow. Otherwise, if you try to do it afterward, the wood finish might accidentally contaminate the bow hair when you are applying it.
Now for the question of what to use for bow hair. There are two types: real horsehair, and synthetic. For a bow like ours, which has a fixed amount of tension, I would recommend going with synthetic bow hair. The reason for this is because of stability – if we have no way of adjusting the tension, we’ll need hair that will be as impervious to environmental changes as possible. Synthetic bow hair is basically plastic, so it shouldn’t absorb as much ambient moisture as its organic counterpart. And while some say that real horsehair sounds better, (most violin bows use natural horsehair), I think that to most players, the difference is slight – I really can’t tell the difference at all.
One brand that was recommended to me, and that I have had good experiences with is Hervex synthetic bow hair. It is available online from such sites as Elderly, Musicmaker’s, and Folkcraft, and only costs a few dollars for a hank. One hank of horsehair should be able to make 2 to 3 psaltery bows. (This just shows you how much less hair is used in our homemade bows versus a real violin bow.)
Once you have the bow and hair all ready, take about half of the hank of hair, (or 1/3 of the hank if you are trying to stretch it into several bows), and tie a knot in one end. Next, hold the hair by the end of the knot so all the hair is dangling down, and comb it with a fine-tooth comb. (I’m serious!) Get all of the tangles out, and get the hair as straight and even as possible.
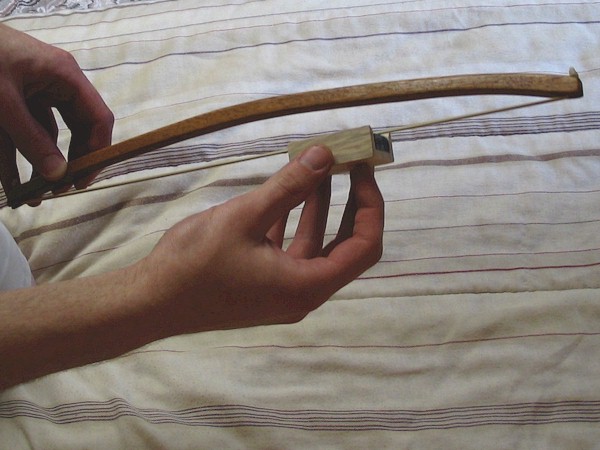
Next, it will take a little bit of experimentation to find where to tie off the other end. The bow hair will first be slipped into the first notch on one side of the bow – being held in by the knot – and then stretched over the end and into the other slot. The idea is to tie the hair short enough so that there is still adequate tension once the hair has made it over the hump, but not so short that you practically have to break the bow to get the hair into the slot.
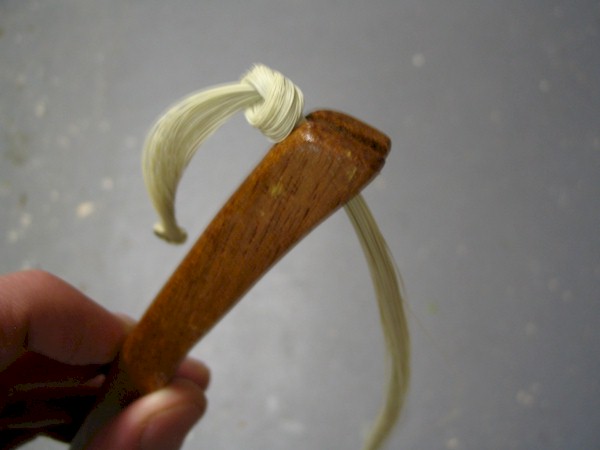
One way to tell if you’ve got the hair tight enough – and straight enough – is that there should be no slack hairs in the bow. If there are slack or loose hairs, take the hair off the end, remove the knot, recomb it and tie it again. It only takes a few seconds to retry; keep at it until you get all the hairs tight. You should have to exert a fair amount of pressure on the bow to get the knot over the last hump – but in all honesty, I don’t think I could break this bow with my bare hands if I even tried my hardest. So, make sure the bow is sound and strong, then put the hair on tight!
Now, once you’ve got the hair tied off to your liking, you’ll have a lot of excess to trim back. You can either leave the knots as they are, and trim the hair back to about 1/4″ above the knot, or you can try the following trick:
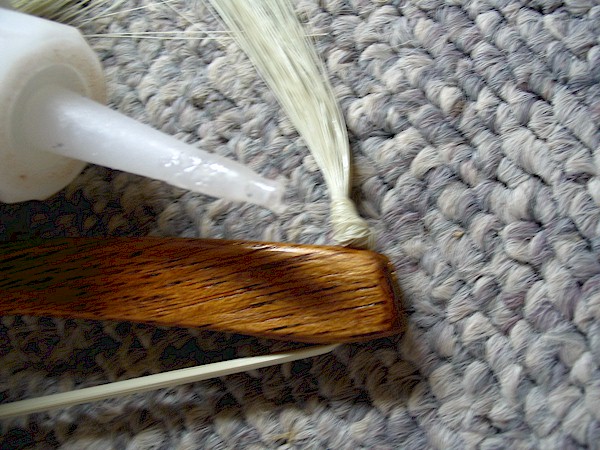
If you use very thin, water-like consistency CA glue, (I prefer “Hot Stuff”), you can wick the glue all the way to the middle of the hank, and effectively “lock” the knot in place. Once this is done, and the glue is fully cured, you can take a scissors and cut the hair off directly above the knot. (Don’t allow any glue to get on the area of the hairs that will be played on the psaltery!)
Rosin up the Bow:
After this cleanup stage, we’re all done with the bow! You’ll need to get some rosin and apply it to the hair to help it “grab” the strings. Rosin is widely available at almost all music stores, locally and online, for dirt cheap. It comes in a cake and is slid across the hairs back and forth. There are two varieties – light and dark. The dark is slightly softer, and gives a little bit more grab to the string, for a coarser sound. I like to use the dark because I think it helps the bow grab the lower strings better, but I really can hardly tell the difference between the two – either one will work fine.
With a new bow on your first time, it is necessary to prime the bow with rosin. The slick surface of a new rosin cake is not very conducive to filling the hair with rosin. To remedy this, you can roughen the surface of the rosin by cutting criss-crosses in it with a sharp knife. (You could also use coarse sandpaper to achieve similar results.) For the first time, run the rosin up and down the taut bow-hair several times until it seems to be sticky. In newly made bows this may take a minute, but in the future you should only have to give a few quick, occasional passes with the rosin to prepare the bow.
So, rosin up the bow, it’s time to play!