
Compared to the frame, the back is much easier. The only thing that may be of trouble is the thickness of wood required—between 3/16″ to 1/8″.
Here is a sketch of the overall dimensions of the back:
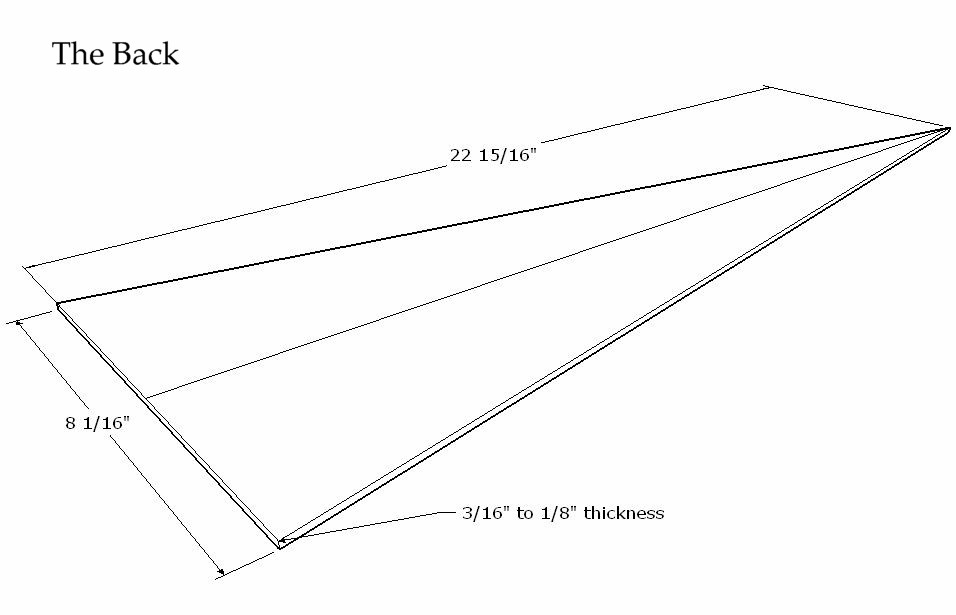
It should be noted that the sizes listed for the back are the exact size—I would recommend giving yourself at least an extra 1/8″ on all sides as “slop” room. Personally, I first build the frame, and then just lay the frame directly on top of the back and trace the outline. (That’s why I have the frame listed first in the order of construction.)
Now, there are several ways to get the back down to the required thickness. The first and easiest is just to buy 1/8″ thick plywood. Plywood this thin isn’t always available at hardware stores, but can usually be found at most woodworking stores. This is most commonly available as 1/8 inch “baltic birch” plywood.

In addition to 1/8″ plywood, a lot of woodworking and hobby stores also sell certain species of solid wood down to 1/8″ thick. This is sometimes referred to as “craft wood.” However, you are probably not going to find such pieces wide enough, (about 8 1/4″ total width), so it may be necessary to edge-glue two or three pieces together to get to the required width. (Note the line running down the middle of the back in the drawing at the top of this page. The plans show a two-piece back, which is what I have used on the psaltery for this project as well.)
There are also many more vendors online, especially on eBay, which sell wood in 3/16″ and 1/8″ thicknesses. You can try searching for guitar backs as well, (usually found under the search term guitar sets), which are sometimes wide enough to be used as a one-piece psaltery back.
Basically, guitar backs come in two halves, which are meant to be edge-glued together to form the back of a guitar, and one half should be ample to cover the back of a much smaller psaltery. Just be sure that the backs are both long enough and wide enough before ordering! Most backs will not be 23″ long, so you may have to look around.
Another option is to find a board the right size in length and width, and plane it down to the right thickness. If you have a thickness planer, this might be a good way to use a wider selection of woods for the back, though it is a bit wasteful. You could also plane the board down to the right thickness by hand using a bench plane. I did this once… Once!
Another “planer” that I’ve used is called the Wagner Safe-T Planer, which is used in a drill press. It excels at planing smaller pieces of lumber – like those used for lutherie. Here’s a photo:
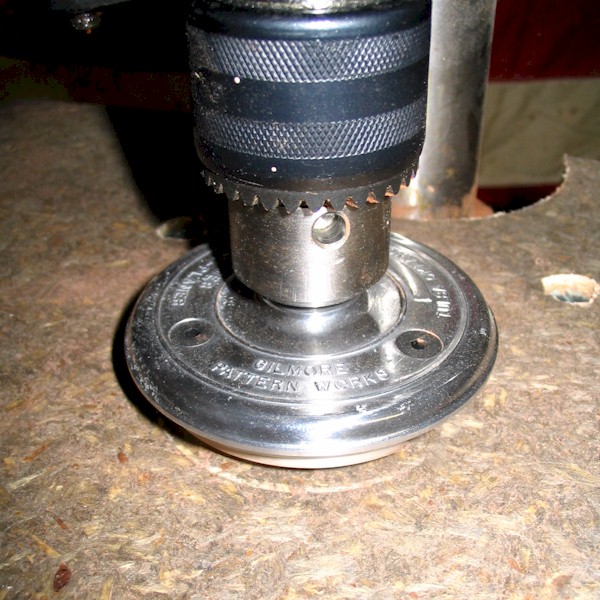
I dismissed this pseudo-planer for a long time until I was finally convinced by all of the positive reviews I kept hearing and I decided to give it a try. It really works! You put it in your drill press, lower and lock the spindle with the depth stop, and run the press at top speed. (Or about 3000 – 5000 rpm.) I first envisioned it as flying off and putting a hole in the wall, but it really does do a good job of planing boards – they don’t call it the Safe-T Planer for nothing. You do have to keep both hands firmly on the board though.
Because the cutters on the Safe-T-Planer hit the wood from the side, not the bottom, it works well on figured wood too. Anyhow, this thing is old-fashioned: its been around for decades. The casting says: Tulsa, Oklahoma – going back to the days when things were not only made in the USA, but you also knew the city and the state too. I got mine at Woodcraft.
Otherwise, a thickness sander will also do an excellent job at thicknessing the back, but is probably not a common tool to most home woodworkers. There is, however, one other way to get down to the right thickness with what is arguably the most versatile of a luthier’s power tools: a bandsaw.
For the back of the demonstration psaltery on this project, I resawed matching Kwila panels from the same board as the sides using a bandsaw. If you have a bandsaw with enough resaw capacity, you can slice your own backs from solid lumber. I prefer to bookmatch my backs so that the grain pattern is symmetrical on both halves. Resawing is probably the most versatile and economical method, but it does require a saw with both a good resaw blade, and also a sufficiently tall resaw height. (Over 4″ from the table to the blade guard for two-piece backs, and over 8″ for single-piece backs.)
A Note Regarding the Thickness of the Back:
I list a range of thicknesses—from 3/16″ down to 1/8″ because a lot will depend on what woods are used, and how comfortable you are working with wood this thin. I would say with plywood you can definitely use 1/8″ thickness, (and probably even thinner), without any worries because its cross-grain plies give it a lot of strength. But if this is your first time, and you are concerned with the consistency of the wood, you can leave the back at 3/16″ thick.
I wouldn’t recommend having a back that is much thicker than this, as it will muffle and absorb a lot of the instrument’s vibrations. The back’s job is reverberate the sounds of the strings – similar to that of a tuning fork. Plywood is not as good at doing this than solid-wood backs because the grain runs perpendicular to each ply next to it, along with the glue needed to bond them together, which can inhibit the path of the vibrations. (Not to mention that some plywood can just have junk-wood for the core, with nicer, sanded wood for the outer plies.)
But, with all this said, if this is your first and only bowed psaltery, then a lot of this will really make little difference as you won’t know the difference anyway. The instrument you build will be your best bowed psaltery ever! (But also your only one too.)
Gluing the Back to the Frame:
Once you have the back cut out and thicknessed properly, it is time to glue it to the frame of the psaltery. Because the back serves to reinforce the frame, I like to use creep-resistant glue for gluing the back on, just like the glue that was used for the frame.
If you haven’t already, now would be a good time to have a look at the various glues used in musical instrument construction.
Gluing the back on does not require the use of any jigs or special tools. You can accomplish the gluing with an array of clamps. I think on my first bowed psaltery, I used just about every clamp I owned to glue/fight the back on, which was quite a hodge-podge team of clamps. “Emptied the bench,” as they say in baseball.
Nowadays, I glue backs on with a clamping fixture called a go-bar deck. It certainly isn’t necessary to use one of these, but they sure do make the gluing process a lot more refined and pleasant. Here’s a picture of the deck that I use:
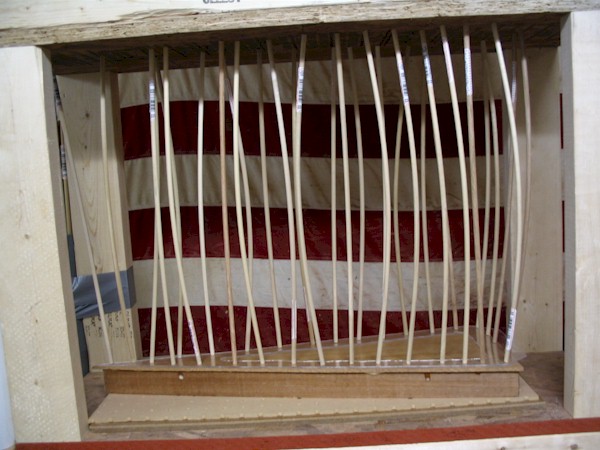
Basically, a go-bar deck consists of a sturdy table, with an enclosed top. Then, the work is placed on the base of the table—called the deck – and strips of wood, (I use dowels), all of identical length are wedged between the ceiling and the object to be glued. These are the go-bars. (I also use a thin piece of acrylic cut into a triangular shape to protect the psaltery from being gouged by the dowels.)
Most other go-bar decks that I’ve seen use all-thread rods for the four legs, and have an adjustable ceiling. I chose to build an extra-beefy stationary version with solid 2×4 lumber for the legs and reinforced the deck and ceiling with 2x3s. Otherwise, I find that I get some warping and bowing when I start wedging all the dowels in place. I just use sheets of MDF, plywood, or hardboard to bring the instrument up to the correct height, rather than have the table itself adjustable.
The nice thing about the go-bar deck is that it lets you put pressure exactly where you need it. You are not limited to just the edges, but you can get deep in the body of the psaltery – especially over the pinblock – to make sure every square inch of the psaltery is firmly glued down. (I actually added a few more dowels after the above picture was taken.
Clean-up and Preparations:
Once the back has been glued on, I like to scrape all of the glue squeeze-out that has formed on the inside of the psaltery. This is the main reason why we have chosen to glue the back on before the top. Otherwise, you can see the glue along the edges when you look through the soundhole in the top.
One other thing that you might want to consider before you move on to attaching the top is putting a label of some sort on the inside of the instrument: your name, when or where it was made, along with any other relevant information that might be of help to others if you ever give it away to someone. If you label the instrument about a third the way up on the inside back of the instrument, it will be visible when you peer through the soundhole.
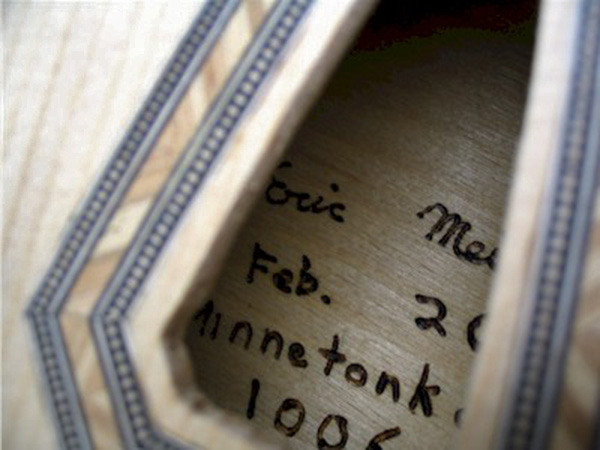
You can glue in a paper label, carve something, burn it in, write it with ink – some people even inlay their signatures with wood or mother of pearl. If you plan to keep your instrument around for a while, a label might be helpful.
Now that we have the back out of the way, it’s time to move on to the top, otherwise known as the soundboard.