
Now that we have the main component of the psaltery built, (sometimes called the soundbox), we can begin to lay out the positioning of the zither pins. In this category, there are two locations for the pins: the first group are the tuning pins, which are embedded into the pinblock at the base of the psaltery, and the second group, (whose spacing is much more critical), are the hitch pins – where each string will eventually be anchored along the sides of the psaltery.
The Layout of the Tuning Pins:
We’ll start with the easiest group – the tuning pins. There will be two rows of pins, with 13 pins on the bottom row, and 12 pins on the top row, all equally spaced, for a total of 25 tuning pins. The first step is to divide the pinblock up into three sections. The bottom row starts 3/8″ up from the bottom of the psaltery, with 1/2″ dividing the two rows. See the plan below:
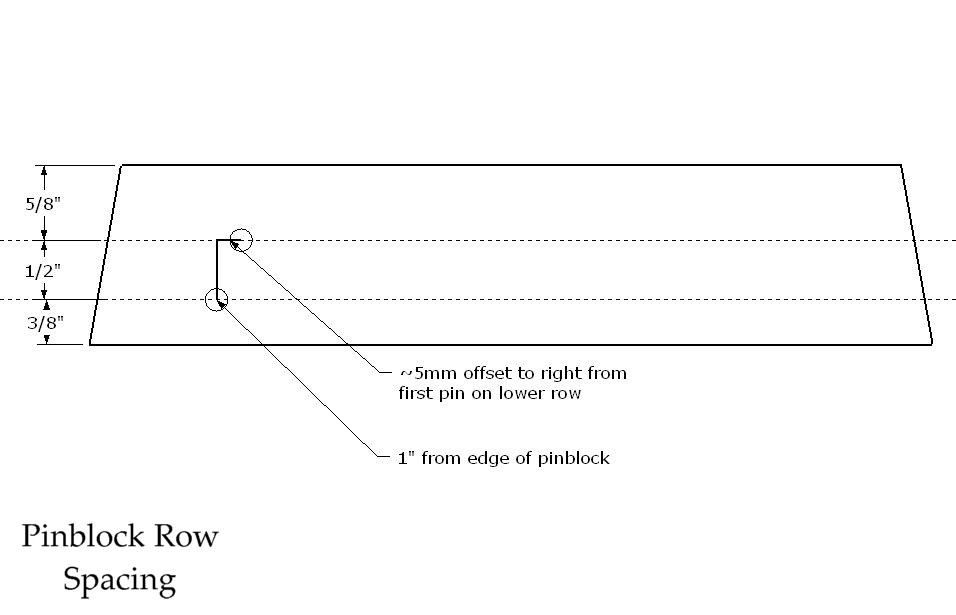
Start laying things out by lightly drawing two pencil lines across the top of the psaltery, with the first line being 3/8″ up from the base of the psaltery. (These lines will obviously be erased or sanded off prior to finishing.) Then, measure up 1/2″ and draw the line for the second row.
Next, looking at the above picture, imagine that you can see through your psaltery’s top with x-ray vision, and you can see the hard maple beneath. The first pin on the bottom row starts 1″ from the edge of the pinblock. Please note, that does not mean 1″ from the edge of the instrument; depending on how thick you made your sides, this distance will vary. With 1/2″ sides, the first pin should be located a little over 1 1/2″ in from the left edge.
Next, move from the location of the first pin on the lower row straight up to the second row, and measure over to the right about 5mm. This point is where the first pin of the upper row will be. This 5mm distance offsets the pins on the top row so they don’t completely block the string’s path to the back row.
Now, continuing on, measure out 13 pins for the bottom row, and 12 pins for the upper row. The plan below shows the spacing on the standard sized pinblock we have been using according to the plans.
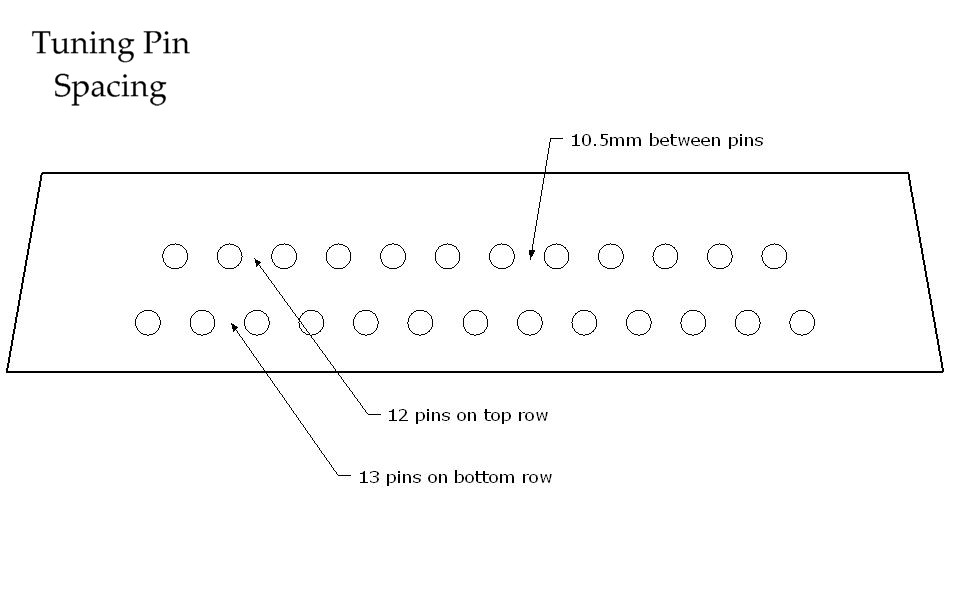
You may need to adjust your spacing to get the pins centered on the pinblock and looking right. Obviously you won’t be able to measure over and count exactly 1/2 of a millimeter, but if you put a ruler along the line, you can count 10.5mm, then 21mm, then 31.5mm, and so on. Doing so prevents tiny errors from accumulating and throwing off the last few pins. 1/2mm times 12 is 6mm, so your spacing could be off by as much as 1/4″ or more by the end of the pinblock, which can be significant.
(Note: You may notice that the project psaltery has the tuning pins flared out a bit more at the base than what the plans call for. When building the demonstration psaltery, I found that the strings came very close to overlapping on some of the hitch pins, and decided to alter the plans by compressing the tuning pins in toward the center of the pinblock to alleviate the string spacing. With the revised spacing, the strings should travel almost straight down from the hitch pins to the tuning pins.)
The Layout of the Hitch Pins:
Of all the measurements on a bowed psaltery, perhaps none is more important than the spacing of the hitch pins. It is the hitch pins that determine the vibrating length of the string, and therefore the tension on the string, how close it is to its breaking point, and to a great extent, how nice the string will sound overall. Take your time with this step, and make sure you measure as accurately as possible.
Now, to begin laying out the hitch pins, we first will draw two lines on the soundboard, one down each side of the psaltery. (Again, we will erase or sand off these lines later.) Measure in exactly 1/4″ from the right edge of the psaltery at several points along the length of the instrument. Connect these dots, making sure that the line is parallel to the side of the psaltery. Repeat this for the left side of the psaltery. Now, where the two lines meet at the tip is the first note. This is where the first hitch pin hole will be drilled, and this is the base from which all the other pins are positioned.
Look at the spacing for the remaining 24 pins below: (this might be a good one to print out)
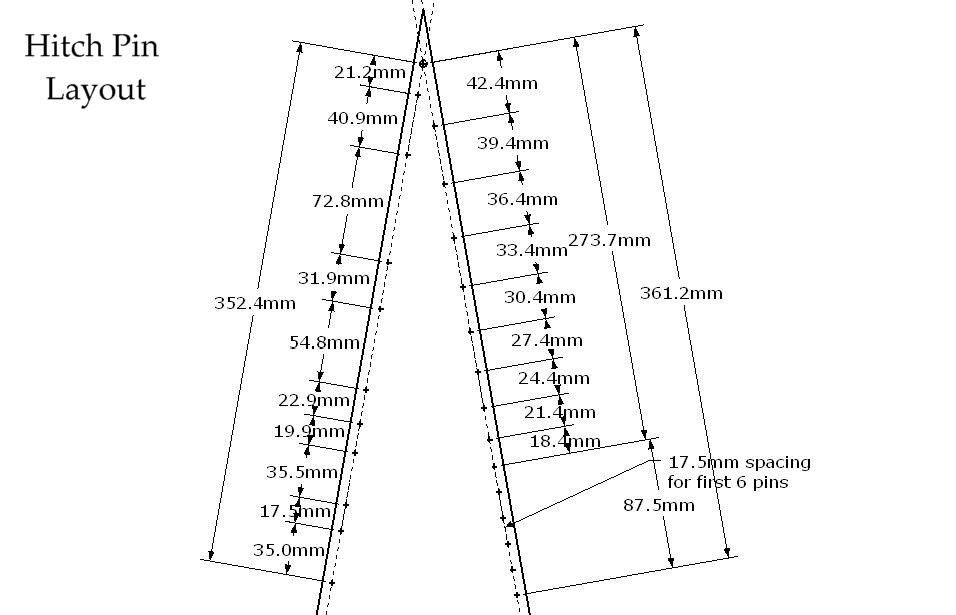
Again, you are not expected to be able to eyeball and measure out a tenth of a millimeter, but the numbers are included to avoid cumulative errors. If I were to round off all of the distances, the cumulative effect at the end would be off by a significant margin. You can check your overall spacing by measuring the very last pin on each side and seeing if it is within 1 or 2 millimeters of 361.2mm for the right, and 352.4mm for the left.
Better yet, simply put a metric ruler down the entire length of the side, and add up each number successively to eliminate the chance for a cumulative error. Alternatively, you could simply measure out the first and last pins, and then work your way inward from each end, halving the cumulative effect.
The right-hand side is the most straightforward. If you look at the bottom right of the plan, the first 6 pins have equal spacing of 17.5mm each. From there, the spacing is 18.4mm, and increases by 3mm on each successive pin, up to 42.4mm spacing. If you are curious as to why this is so, I’ve included yet another side-discussion talking about string lengths and spacing on the bowed psaltery, and why even hitch pin spacing doesn’t work well.
On the left hand side, notice that these pins are arranged like the black keys on a piano. (They are the sharps and flats.) They occur in a two-three, two-three pattern. (Except the first sharp and the last two sharps are outside of the range of the psaltery, so it’s two, two-three, two-one.) Don’t be alarmed if it appears that there are gaps in the pins on the left-hand side – there’s no such thing as B-sharp or E-sharp!
Drilling the Holes for the Pins:
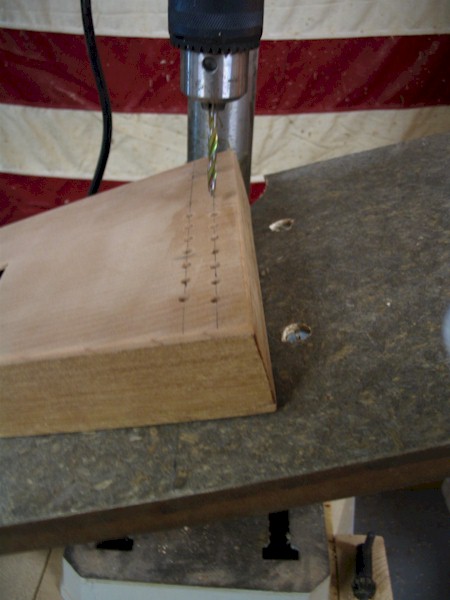
Once you have everything laid out, look everything over once more to make sure that there are no obvious errors or mistakes. Once you’ve drilled a hole in the top, its hard to un-drill! Now begin by drilling 3/16″ diameter holes in all of the hitch pin locations. For the tuning pin holes, see my tip on tilting the drill press towards the bottom of the page.
As for the depth of each hole, I personally drill about as deep as I possibly can without risking the bit piercing through to the other side. In all practicality, about 1 1/4″ deep should be fine. However, I am a big fan of “trimming the fat” so to speak, and the sides of a bowed psaltery, compared to most other stringed instruments, are thick and blocky. Any opportunity where I can eliminate unneeded material and improve sound transmission across the instrument will be taken. So, whenever possible, I drill as deep as I can – within safe limits of course.
For the actual drilling, I really recommend using a high-quality brad-point drill bit and a drill press to drill these holes. A brad-point bit is a drill bit with a tiny spur at the tip to help keep the bit from wandering and to ensure that you know exactly where the hole is going to be drilled. Also, higher quality bits are machined to much tighter tolerances and will be more sure to be at exactly 3/16″. (Chances are, if you pulled the bit from a 101 piece set from China, it is suspect at best.) Put the bit in the chuck and spin it, and focus on the very tip of the brad point: if it visibly wobbles much at all, I wouldn’t use it.
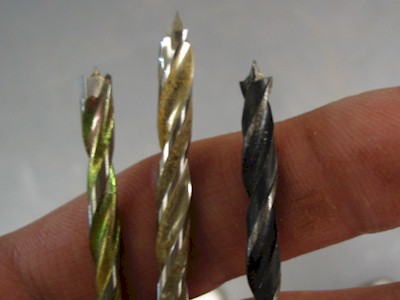
Recently I have been using a carbide-tipped brad point bit, (above left), and I love it. This may be overkill for just one psaltery, but for me, it’s worth its weight in gold. I got it from Lee Valley. The middle bit is a high quality steel bit made in Germany, and the one on the far right is a junk bit that is from an old drill bit set. Quality bits can be found at woodworking stores, and for a bit this small, it will probably cost less than $5.
My whole point of this is that the actual zither pins used for the psaltery – especially those used as the tuning pins – rely on very shallow threads to hold themselves in the wood. If the pilot hole is drilled too big, (which can easily happen with a wobbly bit), it can adversely effect how well the pins’ threads bite into the pinblock, resulting in a decrease in tuning stability. It would be a good idea to drill a hole in a piece of scrap wood and see how snugly the pin can be threaded into the wood. For the highest stability in tuning, you want it very snug. The pins are precisely made for a 3/16″ hole.
One last optional tip when drilling is to tilt the drill press table 15 degrees sideways when drilling the holes for the tuning pins. The reason for this is because when you are winding the music wire onto the tuning pins for the first time, the string will want to wander up and down the tuning pin. By setting the tuning pins back at a 15 degree angle, it is much easier to wind the wire onto the pin downward. Take my word on this, and if you possibly can tilt the table of your drill press, I’d definitely go to the trouble of doing so. (But just don’t try this with a handheld drill.) By tilting the holes, you will save yourself a lot of time during the stringing phase, which to me is much more unpleasant that the hole-drilling phase!
Installing Optional Note Markers:
One more thing that is common to find on bowed psalteries is the presence of note markers. (Very similar to fret markers found on a guitar.) Each builder seems to have their own system or method of doing this, but the overall goal is to make playing the bowed psaltery easier. Usually a dot is inlaid between two pins to emphasize certain strings. Look at this picture of the demonstration psaltery for an idea:
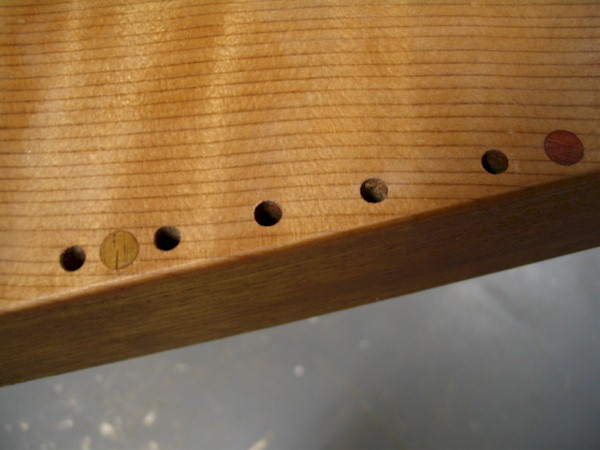
On this current psaltery, I chose to use wooden markers cut from scrap lumber with a plug cutter. On the left, you can see a 1/4″ Kwila dot (it matches the side and back wood), and just barely visible on the far right is a dot made of Bloodwood. My standard procedure is to mark all the C-notes with one color, and all the F-notes with another color. I chose to only mark the right-hand side, as the irregular spacing on the left side is enough for me to get my bearings quickly when playing.
It’s up to you as to which notes to mark, and how you want to mark them. You can visit the tuning section to help you determine where to place them, and what notes you may want to mark. (Most people will at least mark the C-notes, and usually either the G or F notes as well.) Just remember that in order to mark the C-notes, you find all the strings/pins that are tuned to C on the tuning chart, and put a marker below that pin, not above it.
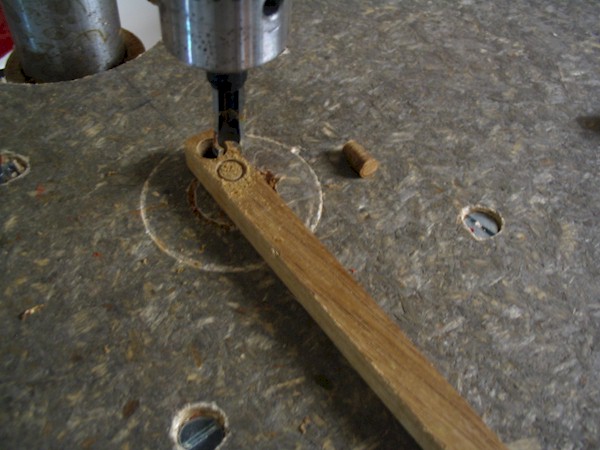
On some of my fancier bowed psalteries, I have used mother of pearl, and even gemstones to mark the notes. For a “psimple” psaltery, however, you can just use a 1/8″, 3/16″ or 1/4″ diameter wooden dowel: inserted, glued, cut off, and sanded flush with the soundboard. Or, you can buy a 1/4″ plug cutter and cut your own plugs from any kind of wood you want. Plug cutters are available at most hardware stores for a modest price – usually between $5 and $10. Otherwise, you can find higher-quality plug cutters from woodworking stores like Rockler or Woodcraft.
Once you have all of the pin locations marked and drilled, and any note markers inlaid, sand off or erase any remaining layout lines and get the entire instrument smooth and clean. Also, go over any sharp edges and corners and dull them down with sandpaper. Round over and smooth out the front tip, the top and bottom edges of the body, and the side corners at the base. In general, make the instrument comfortable to hold, and sanded smooth in preparation of applying a finish.