
Stringing is when this project goes from a triangular wooden box to a musical instrument. It’s also probably the most time consuming part of the whole undertaking – especially if you’ve never done it before. For your first try, I don’t think it would be unreasonable to set aside at least 2 hours for stringing, possibly more. (It of course gets much easier with practice, but with only one instrument to build, that becomes moot.)
However, I’ve gone to every effort to make the stringing process as easy and smooth as possible. I’ve included lots of photos and even a few videos to help you along. (If only I had had something like this when I first strung my very first bowed psaltery – I think I fiddled around putting on the first string for a solid 15 minutes.)
First off, if you already own a bowed psaltery, you may want to reference another article if you are simply wondering how to replace a broken string. Otherwise, continue on below.
Now, the first thing we need is the material to be used for the strings!
Materials Suitable for Music Wire:
Most bowed psalteries today are strung with plain steel music wire. There is really nothing magical about “music” wire – there are no leprechauns in a little music wire factory producing their enchanted strings. Music wire is simply steel wire – with a high tensile strength – that is produced to tight tolerances and consistent diameters.
Online, a few good sources are Musicmaker’s and Folkcraft. You will need roughly 50 feet of wire. (Not really this much wire is used, but it would be a real drag to run out halfway through…) For simplicity’s sake, I would just use one single gauge: size .012″ diameter wire. Ordinarily I would use about three different string gauges, but on an instrument this small (2 octaves) I feel it unnecessary. Again, I’ve separated my technical ramblings from the rest of the building instructions, so you can read the article if you want to hear more about why varying string gauges are used on musical instruments.
If you didn’t do the best job gluing the frame together, and you’re worried about the string tension stressing your psaltery, you can step down to .010″ diameter wire, which will decrease the overall tension on the instrument. You may not get as much volume or fullness of tone with this gauge, but it would be better than a ruined instrument.
If ordering wire online, I would ask the seller if the wire is tin-coated before ordering. Basically, uncoated steel wire can rust and corrode a lot faster than the coated varieties. And while a little rust on a string is not necessarily that detrimental to the string’s tone, it can still be unsightly and will probably shorten the lifespan of the string.
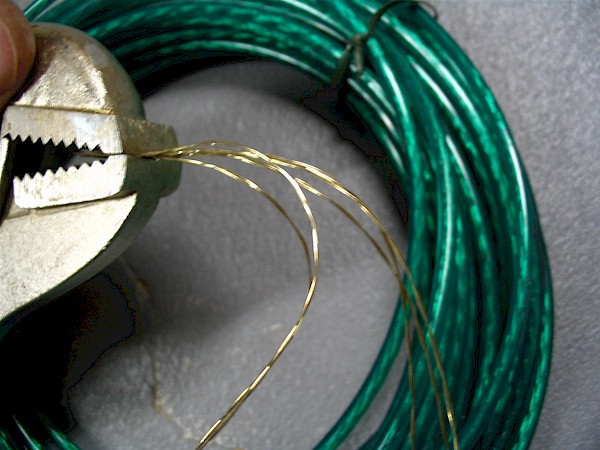
Locally, I’ve found a good source of wire that can be used on a shoestring budget: a certain type of clothesline. The specific type I’m referring to is made by the Lehigh group, and is braided and coated in green vinyl. It’s sold in a plastic bag and is listed as 50 ft. x 5/32″ in size. The model number listed on the front is #955. I bought mine at Menard’s, and I think they are also available at Wal-Mart too. (Since writing, Menard’s has apparently switched vendors to another company, and while the new product looks very similar, I can’t confirm 100% that it is the same product on the inside.)
Now, as a builder, I had oodles and oodles of music wire lying around for this project. But, what fun would that be!? So, in the spirit of “A Psimple Psaltery” I’ve chosen to use the above-mentioned clothesline on our project bowed psaltery. Partly for the adventure, and partly to prove that it is a viable option, (though mildly annoying.) You have to strip the vinyl coating off, revealing five twisted pairs of steel wire. You then have to untwist these wire pairs to (finally!) get to some useable “music” wire. Take a look at this picture:
Now, in all honesty, in order to build a bowed psaltery, you will probably have to order at least one or two things online anyway – a tuning wrench and 50 tuning pins – so I would recommend adding actual music wire onto your order. (For one instrument, it is moderately priced.) But, if you ever find yourself in a jam, and need some wire locally, you know where to find it!
On the upside, one clothesline package contains enough wire to string many bowed psalteries, and the inner wires are .012″ diameter: exactly the size music wire I would recommend for this psaltery anyway. Also, the wire has a yellow coating on it, which I suspect might be zinc – so it should have decent corrosion resistance too.
Now, as long as we are on the topic of makeshift music wire, let me address one last question: how about fishing line? Well, to get a better grasp on string gauges and tension, you might want to read over the discussion on string gauges, but in a nutshell, it can work—how well will depend on several factors.
The key is getting enough tension with the string. For reference, the .012″ steel music wire I mentioned above has a breaking point of nearly 40 pounds. In order to get sufficient tension with a monofilament (nylon) fishing line, I would recommend trying to approach at least half this number. Basically, you will need a line much thicker than the steel wire in order to make up for the decreased tensile strength of nylon. (Consider looking at sizes of around .032″ diameter nylon.)
Additionally, even if you do find nylon of the correct gauge and tension, nylon is much weaker in terms of abrasion resistance, and I’ve found that it is susceptible to being cut and sliced through from the sharp bends in the hitch pin’s hole.
Regardless of all this, you are certainly free to experiment! With little tension on the strings, you may get decreased volume because so little of the strings’ vibrations are being transferred to the soundboard. (Which may be an upside – you won’t wake the neighbors!) Tension helps drive the vibrations into the rest of the instrument’s body – among other things.
After all this, I trust you have found the right string/wire for your psaltery, now it’s time to get down to business!
Inserting the Pins:
I should add a brief disclaimer here: there are many ways to string a bowed psaltery. (Some are perhaps better than others.) What I describe here is simply my own method. You are free to modify, tweak, or otherwise change anything I say here, so long as the end result comes out the way we want: with the strings on the bowed psaltery and making music!
For my method, I find it fastest and easiest to put all the pins into their respective holes first, and then string it afterward. Some builders add one pin at a time. Do whatever suits you best. I will describe my method: so, we begin by driving in all the tuning pins, and then the hitch pins too. Here’s a little trick I’ll throw in:

I used the tool above to quickly drive the hitch pins into their holes. (A T-handled wrench was stripped of the handle, and ground down to have a few flat faces on the shaft for the chuck to grip.) Using a power tool to drive the pins in is fast – so fast, in fact, that it can burn the wood, which can be bad. (The burnt wood is not as good at holding the thread-paths of the pins.) Because of this, I only use a power drill to drive the hitch pins, not the tuning pins. The hitch pins are stationary, and once they’re in, the threads aren’t used anyway. Some builders will actually drive the hitch pins in with a hammer. (Not wanting to accidentally crack my fine instrument open like a coconut, I avoid this ape technique!) Do whatever you’re comfortable with.
As it has been mentioned earlier, you will need a total of 50 pins. (25 will be used as hitch pins, and 25 will be used as tuning pins.) They go by a lot of names: zither pins, harpsichord pins, tuning pins, autoharp pins, dulcimer pins, etc. Whatever they call them, make sure they are the type that are meant for a 3/16″ hole, and that they have a hole drilled in the side of them. (I would also recommend using nickel plated pins as well, if for nothing else than aesthetics, in addition to corrosion resistance.)
I intentionally chose 50 pins for this project, (and therefore 25 strings), because a lot of places will sell the pins in pre-measured quantities of 50. Tuning pins can be bought online from such sites as Elderly, Musicmaker’s, and Folkcraft – and while you’re at it, pick up a tuning wrench to fit the pins too:
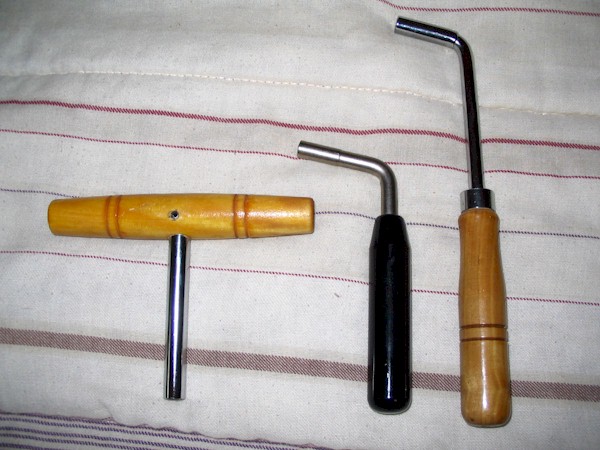
Of the three wrenches listed above, my favorite for building is the T-Handle. It lets you get better downward pressure when driving the pins, and is easy to turn with one hand. On the other hand, my favorite for tuning is the gooseneck wrench on the far right. Actually, any of these will do, it’s just that certain wrenches make certain jobs easier to perform.
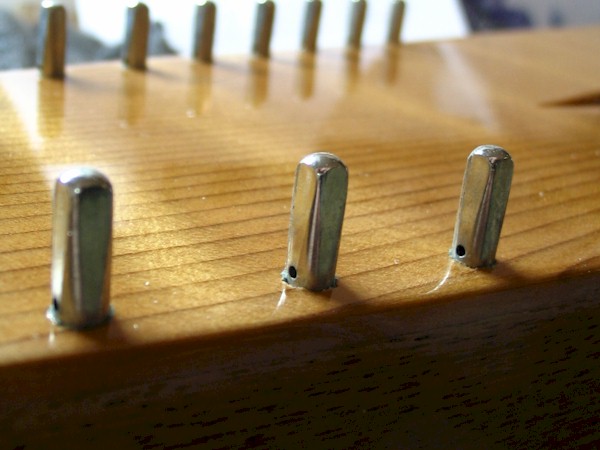
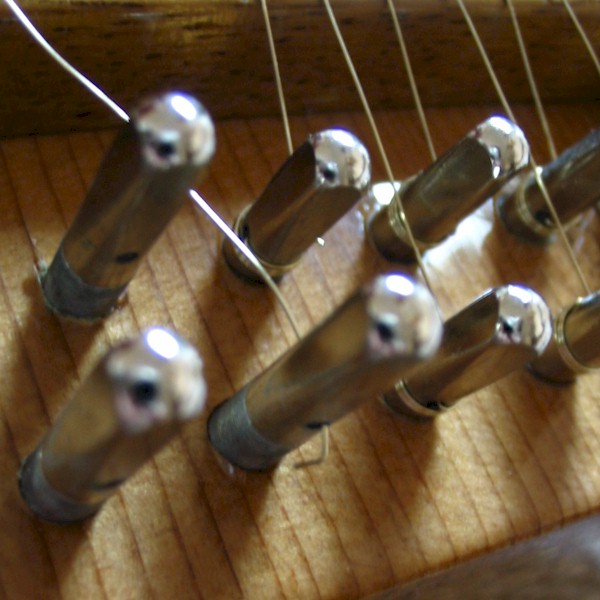
Next, carefully drive all the tuning pins into their holes at the base of the psaltery. If you’ve drilled angled tuning pin holes, take extra care to make sure you start the pins at the correct angle. (Actually, I do use a cordless drill to start the tuning pins into their holes. I drive the pins easily through the soundboard and feel an abrupt increase in resistance when I hit the hard maple pinblock – which is when I know to stop using the drill and drive them in by hand.) Again, some builders will drive these pins in with a hammer; I chose not to.
As for the depth of the tuning pins, leave them a good ways out of their hole to allow extra room for winding the string onto the pin. The idea is that once you have wound the string around the tuning pin about 3 – 4 times, it should be as deep into the pinblock as possible, (to maximize the surface area of the threads contacting the pinblock), but not too deep. By too deep I mean that the string starts to scrape and abrade the top of the psaltery as it is forced into the soundboard. This is not only bad for the soundboard, but since the pin can’t really go any deeper, it may also strip out the threads in the pinblock – decreasing its stability and longevity. Since it is worse to go too deep than too shallow, I tend to leave myself a little bit of breathing room in this area. Here’s about where I had mine: note the height of the exposed threads:
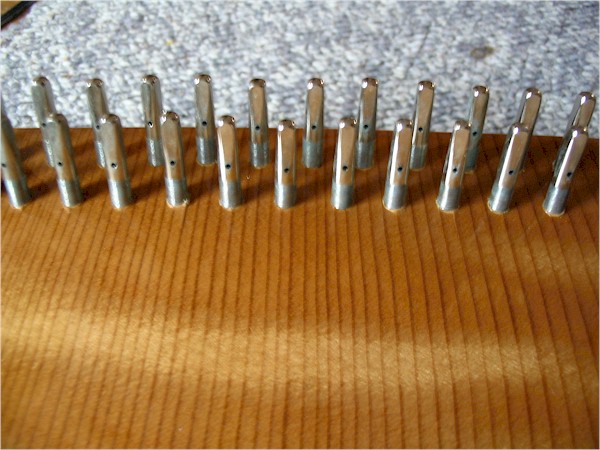
It may take a few trial-and-error tests to get the height correct. One thing though, for aesthetics’ sake, make sure that all the tuning pins are at roughly the same height.
Once we have all the tuning pins inserted, next up is the hitch pins. When you insert the hitch pins, orient them so that the hole runs toward the tuning pins. I like to use the tuning wrench, (aligned so that the handle is pointed in the direction of the hole in the pin), to help visualize this:
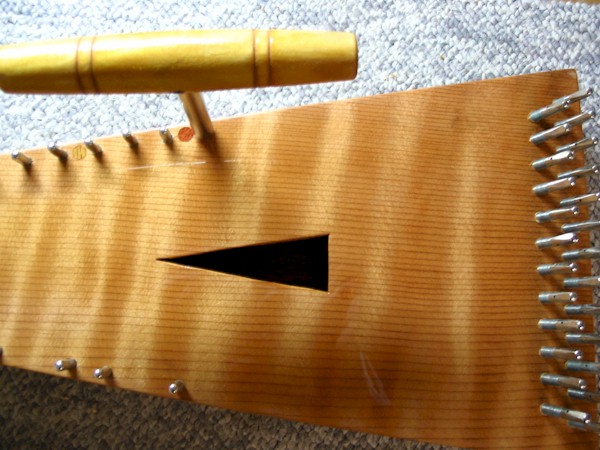
Again, you want to make an imaginary line going from the hitch pin to the corresponding tuning pin. Just go right down the line and align each hitch pin ahead of time. (Note: not all tuning wrenches will have handles with a perfect alignment along the path of the string, but it at least gets you in the right direction.)
Now, in terms of the depth to drive each hitch pin, I like to go just about as low as the pin will allow – with a little bit of working room of course. (Remember that you still have to thread the string through the pin’s hole.) I recommend making a concerted effort to try and drive all the pins to one uniform height. This makes playing easier, and generally looks better too. Some builders prefer to sink the pins just deep enough so that the threads aren’t showing. You can see how deep I like mine in the picture below:
Got ’em all in? Great! Now comes time to notch them. Actually, a lot of builder’s notch their hitch pins before they insert them into the psaltery. (Ha! you should’ve read ahead, because you might have to take all the hitch pins out now.) The reason I like to notch them while they’re in the psaltery is because it is incredibly easy – the psaltery is already holding all the pins upright for you.
Notching the Hitch Pins:
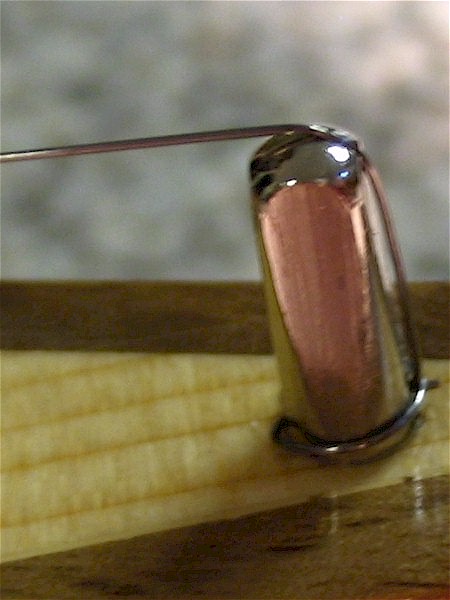
Basically, what we will be doing is putting a small groove in the corner of the pin, in the back center. This groove is for the string to come up and over the top of the pin, and rest in. Without it, the string would fall off the top of the hitch pin when we bring it up to tension.
Here’s a good picture of a hitch pin that shows the path of the string, and illustrates what we are trying to accomplish. (Note: this was taken from a different bowed psaltery that I built earlier.)
Now, the slow way to do this is with a hand file. You can take a triangular file and carefully file a notch in each pin.
I prefer using a rotary tool (IE – Dremel, etc.) with a thin cut-off wheel to just run a smooth curve into the upper back of each pin. I leave all the pins in the psaltery, and just buzz away. The entire process probably takes two minutes or so. Once done, I take a brush and gently brush away the metal dust that has accumulated on the soundboard; a can of compressed air does wonders too. You may have to turn some of the hitch pins about an eighth or quarter turn outward to get a better angle and clearance with the tool.
If you don’t already have one, I’d highly recommend you go out and get yourself a rotary tool. They are available at almost any hardware store or online for a modest price. (Usually starting at around $20 or $30.) I now own five of these little buggers, (two cordless, and three corded) and I don’t know what I’d do without them! They can do all sorts of odd jobs and tasks – the first of which will be to notch the hitch pins in your bowed psaltery.
Here’s a brief video showing just how easy it is. (I used a cordless B&D tool for this job.)
Once we have notched all the hitch pins, and have them facing the right way, we’re ready to actually put the strings on. (Finally….)
Preparing for Stringing:
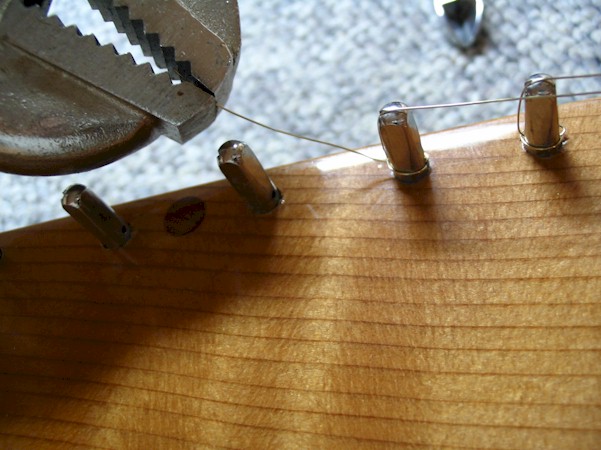
This is where things can get a little tricky. My first piece of advice to you – in order to prevent a lot of fumblings and bumblings – is to clamp your psaltery down to a table or workbench. Obviously, you don’t want to ruin the finish on your instrument, so here’s more on that:
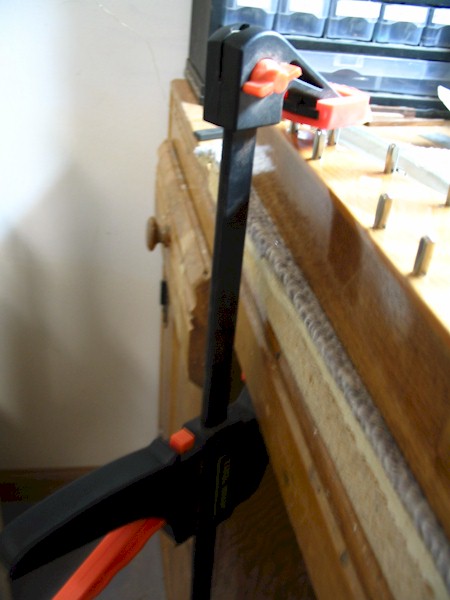
Notice in the picture above that the clamp is actually pressing down harmlessly on two or three hitch pins – not the wood. Also, the instrument itself is resting on a pad of carpet, so the finish on the bottom won’t be scratched either. I’ve found that the best type of clamp for this job is a one-handed bar-clamp, which usually has large plastic guards to keep from marring the clamped material. Probably the most common and widely used of these types of clamps are Irwin’s “Quick Grip” bar clamps, available both online and at most hardware stores.
Now, the basic idea here is to first tie the string onto the hitch pin, and then run it over the bridge and into the hole of the corresponding tuning pin. Then, you wind the string onto the tuning pin by rotating the pin clockwise until the string is reasonably taut. Now, before we jump right in, it will help to be prepared, so I recommend grabbing a few tools.
First, get a nice pair of wire cutters. Actually, for only one psaltery, you don’t need a nice pair – but cheaper ones tend to wear out much faster, especially considering the hardness of this tough music wire. I use a pair of cutters with carbide-tipped jaws, used in orthodontics to cut the wires for braces! They look almost the same as the day I got them: nice and sharp – I can’t say the same for the softer steel that was used in some of my cheaper cutters. I got my pair for a relatively modest price (still much more expensive than a regular pair of wire cutters) from an eBay store called: Orthodealer.
Second, get a pair of needle-nose pliers. This is used to put a bend in the end of the wire to keep it from slipping out at the tuning pin. (More on this further down.)
Third, I recommend using a pair of vise-grip pliers to help pull the knots tight on the hitch pin. You could use a regular pliers, but I find vise-grips, (sometimes referred to as locking pliers), are much easier and safer to use. This is because you don’t have to squeeze when you are pulling on the line, (they lock down onto the wire), which allows you to use all your strength on pulling, and virtually eliminates the chance of slipping.
Last of all, (besides your tuning wrench, of course), I like to use a digital tuner while stringing. I figure, you’ve got your hands on the string right here, and the wrench is already on the tuning pin – why not bring the string all the way up to tune right off the bat? (For more details on tuning, visit the section on tuning.) Bringing a string up to full tune right away also helps prevent problems with slipping wire. For instance, you may find that three winds around the pin isn’t enough to hold the string at full tension, and you may have to wind more rotations of string onto the pin. You won’t know how many rotations are enough to hold the wire until you actually bring it all the way up to playing tension.
Once we have all the tools and materials gathered, and our psaltery is clamped down, we are ready to begin with the first step of stringing:
Tying the String to the Hitch Pin:
This is fairly straightforward. Take a length of string, and thread it through the hole of the hitch pin on the shortest string. Start from the tip and thread about six inches of wire in toward the bridge. Next, wrap one rotation around the pin and bring it back out through the hole, towards the tip of the psaltery, with a few inches of excess sticking out. (This excess is left to easily grab and pull tight with the vise-grips.)
Now, depending on the wire you used, and the size of the hole in your pins, one rotation should be enough to hold the full tension of the string without coming out – but not always. If you happened to use very thin music wire, and/or the hole in your pin is large, you may need two rotations. I used and illustrate just one rotation for this project.
Here’s a video of me tying a piece of wire to one of the hitch pins for the demo psaltery.
Notice that it doesn’t need to be particularly tight – yet. We will pull it tight and bring everything up to tension once the string is wound onto the tuning pin. If you have dialup or are somehow unable to view the video, here is a photo of what the knot should look like once it is tied onto the pin:
This process is for one string. Only tie and wind one string at a time. I recommend stringing the two shortest strings – one on the left, and one on the right – first. The tension of these two strings should then hold the bridge and saddle steady, and you can proceed right down the line, from the lower right section, up toward the tip, and then back down the left side of the psaltery.
Now, you just have that first string dangling there! Let’s move on to the next step:
Winding the String onto the Tuning Pin:
This is the hard part; at least, to do it well, it takes practice.
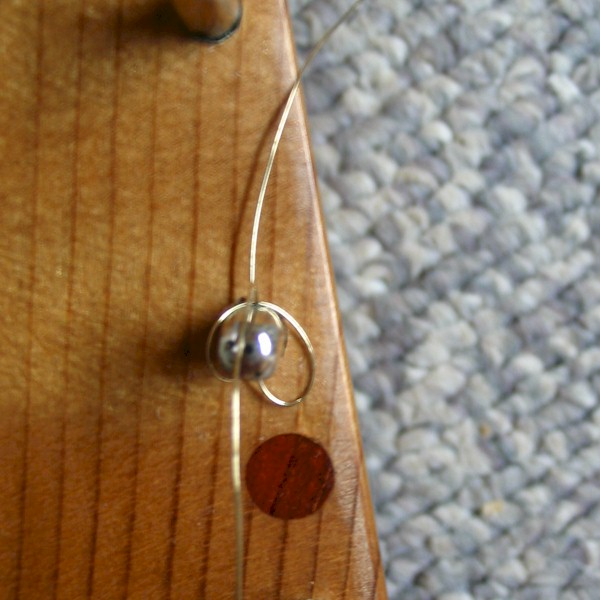
Take the long end of the string that you’ve just tied to the hitch pin, and put it in the groove you made in the hitch pin, and bring it over the bridge and through the hole of the tuning pin. Pull the string somewhat taut and measure out about 2″ beyond the tuning pin, and cut the wire off. This distance will vary depending on a lot of factors, but typically 2″ should be enough for about three to four winds around the tuning pin, which should be an adequate amount to hold the fully tuned tension of the string. If you find that the string is slipping when brought up to full tension, you will need more windings: this is done by increasing the length of string wound onto the tuning pin end. I used roughly 2″ on this project, and it was enough to hold all the strings under tension.
Next, take the needle-nose pliers and bend a sharp downward 90 crook into the wire. I make this hook about 1/8″ up from the end of the wire. This will prevent the wire from slipping out of the pin’s hole while you are winding it. Here’s a picture of approximately what you should now have on the tuning pin side:
One other thing to notice in the above picture: look at the other tuning pins: see how neatly and tightly wound the strings are spooled onto the tuning pins? It is hard to do this on your first try, but try to be as neat as possible. This is where the angled tuning pin trick will really help you keep things tidy. Beyond just looking better, winding the string neatly onto the pin also ensures that the string will not start riding up on the pin. If the string were to start coiling up on the tuning pin, (rather than down), it could eventually make it very difficult to fit a tuning wrench over the pin’s head.
Now, make sure that the string is sitting in the hitch pin’s groove, and pull the wire taut. (If you pull too hard, you will un-bend the crook you put in the end of the wire, so take care.) While you have the string taut, begin with the other hand to use the tuning wrench and wind the tuning pin down into its hole. While you do this, pay attention to where the wire is wrapping itself onto the tuning pin. You want the string to start winding just below the hole and have tightly compacted rows of wire forming just below it.
Keeping the wire taut at all times is the key to controlling where and how it winds onto the tuning pin. All the while, of course, you have to make sure that the string is still sitting in the hitch pin’s groove. This is where you will realize why I recommended clamping the psaltery down, otherwise it could take an octopus to do this job.
Continue winding the string until it is taut and firmly resting against the bridge saddle. Take care on your “landing” when the string gets tight enough to make first contact with the bridge saddle. Once the string is fully tightened, it becomes much harder to move the string left or right along the saddle. The string should be tight enough to be able to pluck, and you should hear a nice “ping” sound from the string. Not too tight though, save that for tuning. (Or you can tune it immediately after it’s wound onto the pin.) If you do happen to break the string, back the tuning pin out to its original height and start over.
Here’s one last video showing how I hold the string taut at all times while winding the string onto the pin.
And, that’s all there is to it! Rinse and repeat. But there are a few loose ends we still need to still clear up:
Final Touches:
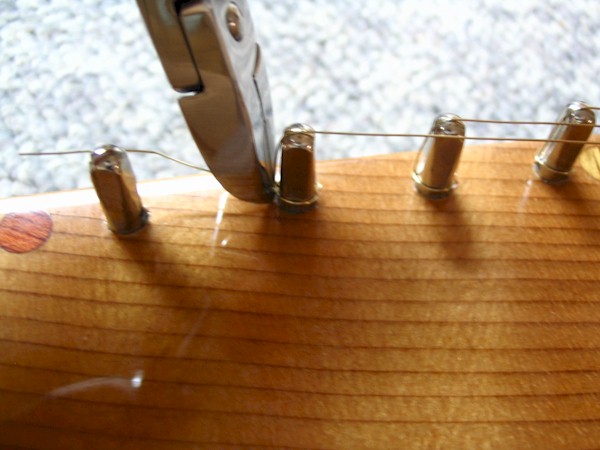
Once you have the first string wound onto the tuning pin, don’t bother trying to tune it up to full tension – it will just slip at the knot you tied at the hitch pin. What we need to do is pull the excess wire as tight as possible and trim it back. Here’s a photo of the tightening:
Pretty straightforward. But just be careful, and always pull slightly up and away from the psaltery. Otherwise, if you do happen to slip, well, I can’t imagine that it would be an enjoyable experience – for you or the psaltery. (Just look at the cold, brutal jaws of the pliers above – that ain’t no pillow!)
Please note, avoid using the pliers on any part of the string that will be left on the instrument, especially in the area where it will be bowed. A pliers can very easily put a permanent kink in music wire – even after it has been brought up to full tension.
Doing a good job of tightening the knots will decrease the psaltery’s break-in time because there will be less “settling” that needs to occur with the string. Otherwise, if you bring the string up to tune with loose knots, it will go out of tune because the vibrations shake the slack out of the knot – reducing the overall tension (and pitch) of the string.
Next, we need to trim off the excess wire. I like to get as close to the hitch pin as possible. If you leave a length of wire, (especially steel wire), hanging out the pin’s hole, it can possibly cut you when you are playing. Here’s a photo of the trimming process:
In order to get very close to the excess wire, you need to make the cut with the very tip of the pliers. The pliers’ jaws are quickly fatigued and dulled when cutting with the tip, so make every cut count! Once you are done, run your finger over the edge of the pin several times to make sure that you cut the wire back far enough and that there is no risk of a cut or poke.
That’s it, all done! Nice work. Now, let’s look at how you go about tuning this thing.
thank you! For someone who is fixing up an old psaltery this is very helpful. Are there varieties in the size of the tuning pins that I need to worry about when I buy a tuning wrench online?
My brother and I have made 2 psaltries using your instructions as our guide. It amazes me that we could do this. Thank you
FYI – Walmart no longer sells coated wire clothes line.