
The frame is probably the most important part of the entire instrument. Between the three pieces of wood, the frame makes up the triangular base of the instrument that holds the load of all the psaltery’s strings in tension. It should be well-made and sturdy! Make sure that the pieces fit together cleanly before proceeding to the gluing stage.
Below is a picture of the overall plan of the frame. Please note the 22 15/16″ length is for the overall length of the instrument, not the length of the sides. (Remember, a triangle’s hypotenuse is longer than its height.)
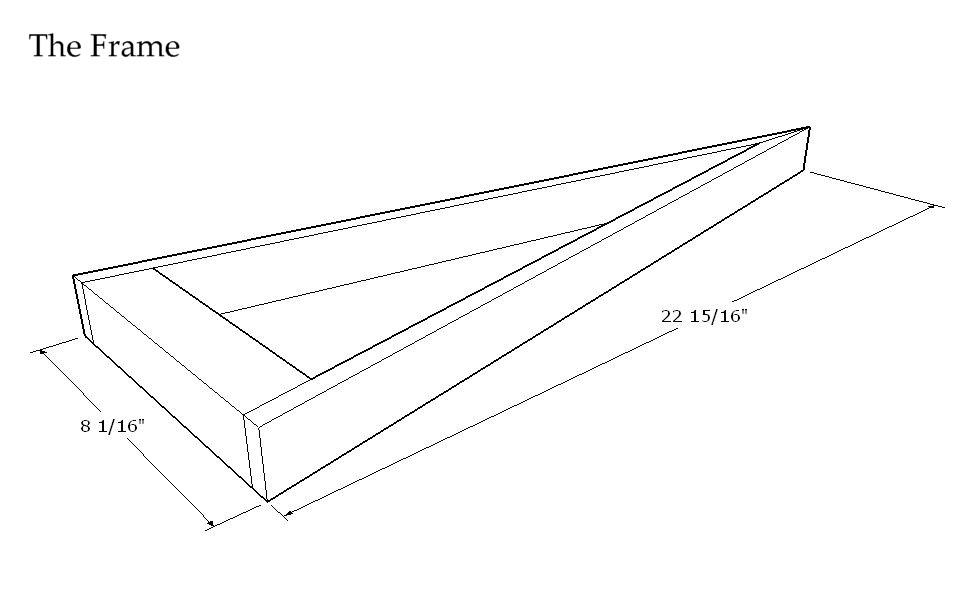
- The frame consists of two sides, and the pinblock
Now, you can see from the plan above that you will need two pieces of wood for the sides, and one for the base. This base is actually what all of the tuning pins will be threaded into, and is called the pinblock. I will discuss the pinblock further down on this page.
The Sides:
For the sides of the instrument, you are free to use virtually any wood available. The sides play a somewhat minor role in how the instrument sounds compared to other areas, but an active role nonetheless. But more than acoustics, the sides play a major role in the weight of the psaltery.
I mostly use 1/2″ thick sides when I build psalteries to reduce the weight, and also to minimize the amount of vibrations that the sides dampen and deaden. (Compared to a guitar or a violin, a psaltery’s sides are big and chunky.) This plan calls for 1/2″ thick sides; however, if you are not careful with your joinery and lumber selection, using sides this thin can compromise the structural strength of your instrument, (because some of the glue joints are that much narrower), and you may want to use thicker side pieces.
You are free to use any increased thickness for the sides of your psaltery, keeping in mind that doing so can drastically increase the weight of the instrument. If you are using store-bought wood, it is frequently surfaced to either 3/4″ or 1″ in thickness—this would be fine for use in a psaltery. Some common domestic hardwoods available locally, listed from lightest to heaviest, are: poplar, cherry, soft maple, walnut, birch, hard maple, oak, and hickory.
Beyond that, there are many, many exotic woods from all over the world to choose from, and many of them are even heavier than the heaviest of the common woods available in the United States. For more information on this, or for the ever-curious, please take a look at The Wood Database for a more in-depth look at all of the wood species.
I think that a good wood for a first psaltery would be soft maple, which would also color-match the hard maple pinblock fairly well. If you’re lucky you may even be to find some figured maple that will give dramatic results, such as curly, quilted, or birdseye maple.
Now let’s take a look at how to process the side pieces so that they can be joined to form the frame:
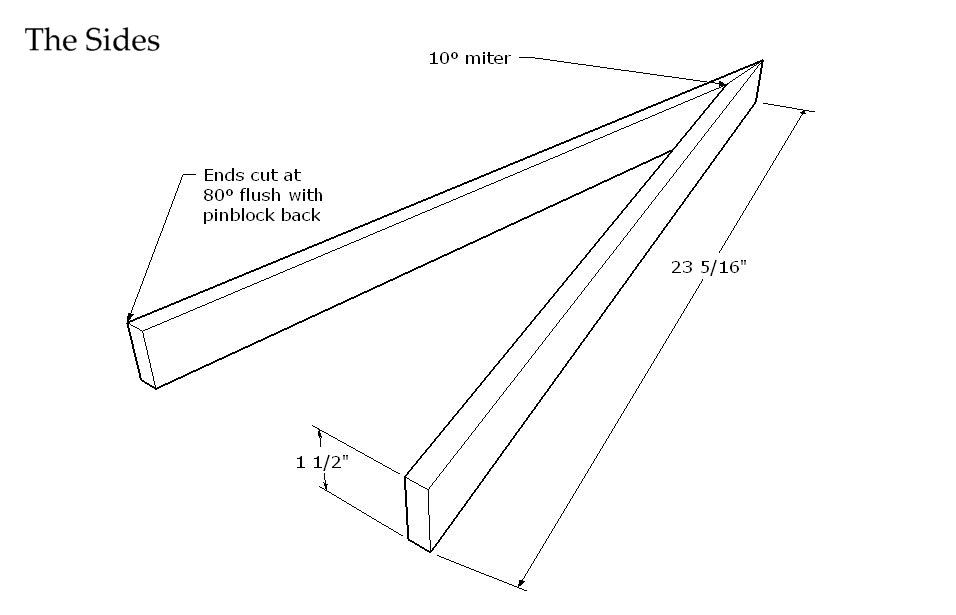
- Perhaps the most difficult part of the building is the 10 miter for the tip of the instrument
The 10 degree miter joint that forms the tip of the instrument is perhaps one of the hardest aspects of building the psaltery; and we get to do it first thing—what luck! At least we will have it out of the way right away. Now, how do you cut a 10 degree angle on a board?
*walks over to miter saw, attempting to set the saw to 10 degrees*
Well, that didn’t work! The part that makes this joint hard is the fact that most miter saws will only cut miters up to about 50 degrees. A 10 degree miter cut is usually considered a taper cut by most woodworkers, but here it really is a miter cut—two 10 degree cuts form to make an overall angle of 20 degrees for the tip of the frame.
Here’s how I cut mine:
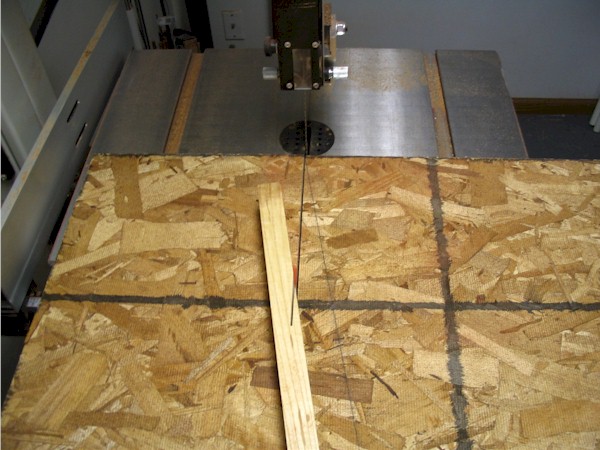
What you see above is a piece of OSB, (you can use MDF or particleboard too), with little runners attached to the bottom that slide in the miter slots of my bandsaw. You can also do the same thing with a tablesaw too – anything that has miter slots running the length of the table. Hardwood or plastic can be used as the runners, but I’ve found the best thing to use are miter slider bars.

Next, a 10 degree angle is penciled out on the center of the jig’s platform, and a piece of wood is glued or screwed along this line as a fence. (Make sure this board is perfectly square, or your cuts will be out of square too.) Then, all you have to do is clamp the side pieces, one by one, to the wooden fence piece, and run the entire jig through the saw until the miter is cut. (You only run the jig halfway through – don’t slice it in half!) Notice the line left by the blade’s kerf in the top half of the jig? (pictured above.)
Otherwise, an alternate to this miter is to just cut a butt-joint:
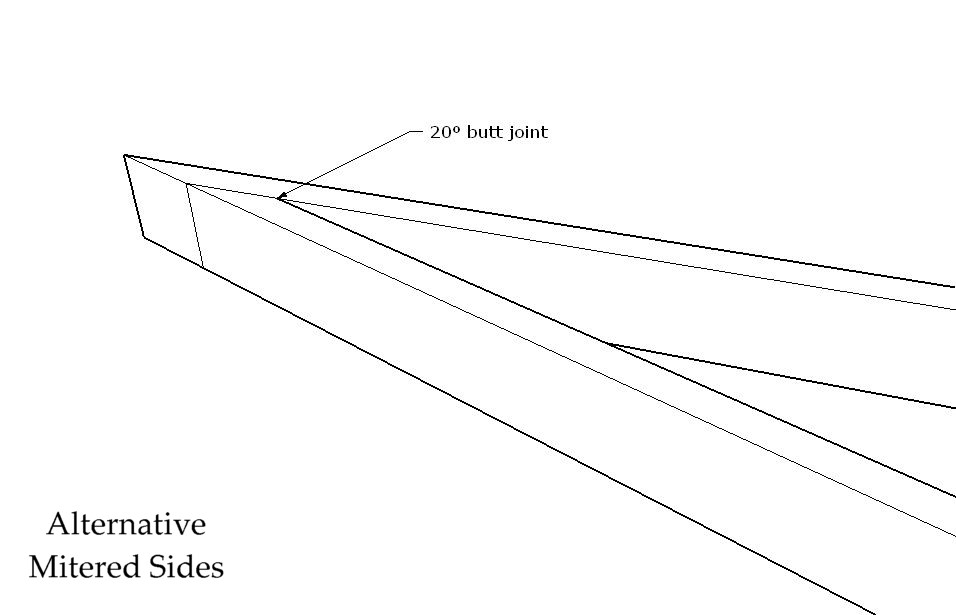
To be honest, the butt joint can be every bit as hard as the miter joint. You still have to cut an angle that is beyond the capacity of a miter saw, and is really no easier than a miter, except that you only need to cut one piece instead of two. I’d guess that it would be slightly harder to clamp together when gluing too.
The Pinblock:
Now that we have the two side pieces cut, it’s time to move on to the third element of the frame: the pinblock. Here’s a quick look at the size of this piece:
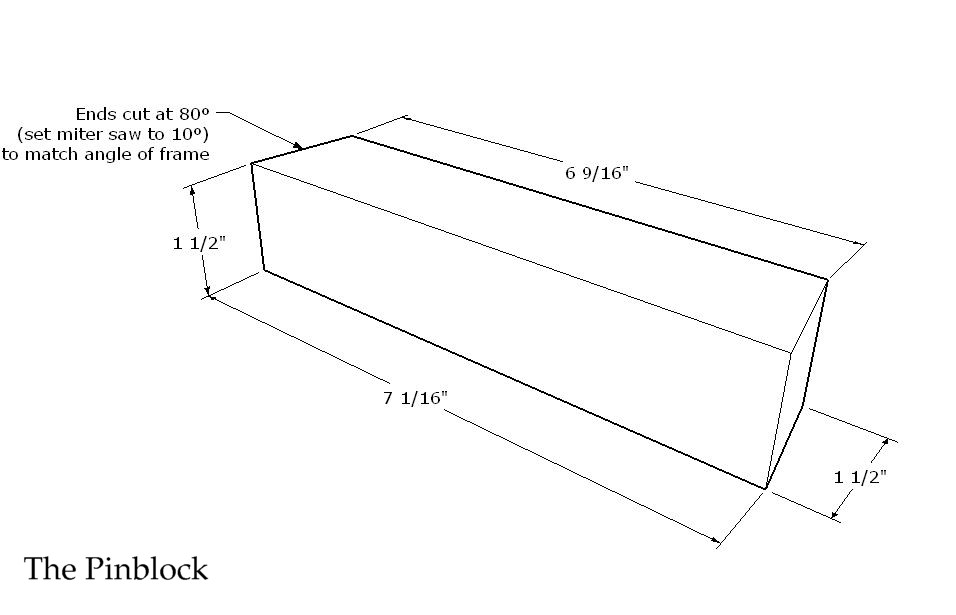
Depending on how thick your side pieces were, the pinblock may be longer or shorter than what is pictured above. What is listed for the length (7 1/16″ long) is if you have used 1/2″ thick sides. Conversely, if you are using thicker sides, you may also leave the pinblock length the same and increase the overall length of the sides instead. (That is to say, do you want the sides to be thicker than the prescribed 1/2″ on the inside dimensions of the frame, or the outside dimensions.)
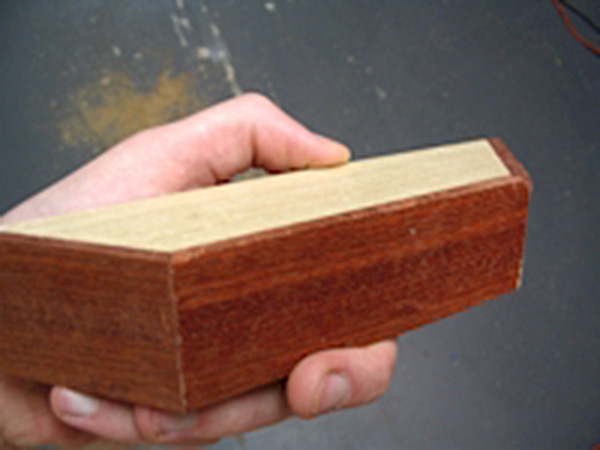
Unlike the wood used for the sides, the pinblock must be made of a certain kind of wood – usually hard maple. (Well, I shouldn’t say must, but it’s a very good idea.) Basically, the tension of the strings will be held in place by small threaded pins that will be seated in the pinblock. These pins are then rotated either clockwise or counter-clockwise to tighten or loosen the tension on the string. (Just like a bolt or screw.)
Because the pins are actually threaded into the pinblock, hard maple should be used for this piece of the psaltery. If you want to hear my entire discussion as to why this is the case, then you can go to the page I’ve created on pinblock woods. But for those who are just interested in the whats and hows of this project, you can continue on below.
You should be able to find hard maple all over the US, either from local sawmills, some hardware stores, woodworking stores, such as Rockler or Woodcraft, or even online from eBay. And one additional note: although it is best to find one solid piece of maple that is 1 1/2″ thick, you are certainly welcome to glue two 3/4″ thick pieces together to achieve the 1 1/2″ height – provided the glue joint is clean and solid. (Just make sure the joint runs side to side, and not top to bottom.)
An important note regarding the selection of a pinblock wood: you want it plain. When you are looking at hard maple, do not choose a piece that has knots, curl, spalt, birdseye, or anything out of the ordinary. The crucial thing to remember is consistency and homogeny. Pinblocks have a thankless job – to hold the tuning pins still, and therefore keep the strings in tune. Using a “wild” piece of wood for this area will make it harder to keep the psaltery in tune.
But even though the pinblock is made of hard maple, you can still cover it with a thin strip of wood to give the frame a homogenous, uninterrupted look. Here’s a picture of a covered pinblock, (in a slightly different shape), from a psaltery I built out of bloodwood:
Gluing the Frame Together:
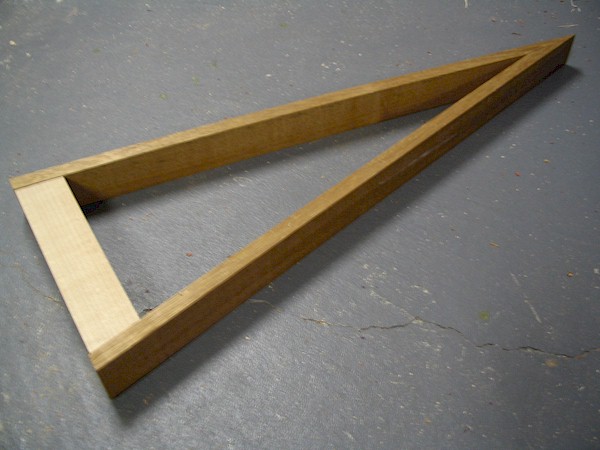
Once all of the pieces have been cut and test fit, it is time to glue the frame together. One item should be mentioned on the test fitting: make sure the pinblock fits snugly against the sides. The bond between the pinblock and the sides is probably the most important of the entire instrument, and is subject to the greatest amount of stress. If nothing else, try to get this joint as clean and snug fitting as possible.
In my demonstration psaltery, I have used an exotic hardwood called Kwila (sometimes called Merbau) for the sides, and a hard maple pinblock. (I later added a thin veneer slice of Kwila to cover the maple pinblock at the base of the psaltery.) Here is a picture of the frame:
Now, it is true that there are all kinds of glues available, but some are better than others when it comes to musical instrument building. While it is possible to use regular yellow wood glue, I’ve discussed the various glues and their strengths and weaknesses. For beginners, I would actually recommend using some 2-part woodworker’s epoxy.

Gluing the frame together is much trickier than it looks. The reason for this is because when you go to clamp the sides against the pinblock, it will slide out like a banana peel! (And if the psaltery could laugh at you, it probably would right about now.)
There are probably a hundred ways to go about doing this job, but the most important part is that you have a plan before you start slopping glue on your carefully cut pieces.
What I use is a simple jig to hold the pieces in place, which also gives you a place to clamp the wood so it won’t move around. It may seem like a lot of jigs are used, but they really do help give better results. (Trust me, once you have a bunch of glue slathered on the wood, and you are quickly struggling to keep it together without it sliding apart, you will realize why you needed a plan before jumping into gluing – sans any sort of jig.)
Here is how I glue together the pinblock:
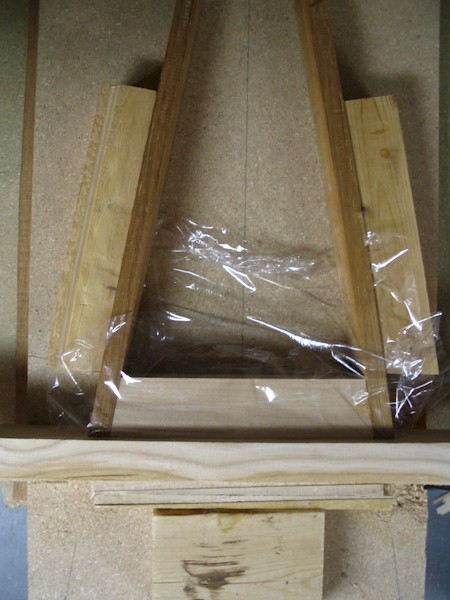
The jig above is simply a piece of particle board slightly bigger than the overall size of the psaltery, with the overall outline of the frame carefully measured and penciled onto the jig’s base. (Take care to get the narrow angle at the tip laid out accurately.)
Then, scrap pieces of wood are glued or screwed down onto the jig’s base along the lines marked out for the sides and back (again making sure these pieces are square and level.) These glued pieces of wood sit on top of the jigs platform and hold the psalterys frame in place while being glued. (They also act as an excellent place to position clamps to keep the frame from sliding around.)
I gave myself about 2″ of extra room on the bottom guide piece that holds the pinblock so I wouldnt have to be absolutely perfect on the overall length of the psaltery. I then use a flat and level strip of wood to hold the pinblock snug up against the side pieces, and pound shims in between this wood strip and the bottom guide-block on the jig to make up the extra distance. (Note: I also use either waxed paper or plastic cling wrap between the psaltery and the jig to prevent the instrument from being glued to the jig!)
From here, you can clamp the sides against the pinblock with a bar clamp as tight as you want – it’s not going anywhere! Also, you should be able to get enough clamping force at the tip of the psaltery with just one or two spring clamps, but I like to overdo things sometimes, so I used some special 10 shims that matched the reverse angle of the tip to really clamp down hard with a c-clamp.
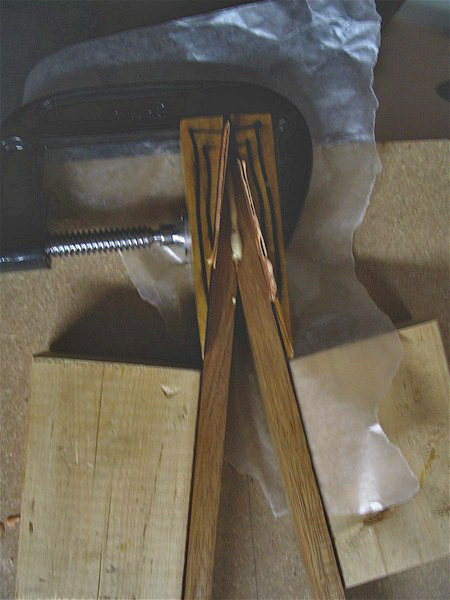
Now, if you had saved the scrap pieces that you cut off from your two side pieces when you cut the 10 miters, you’d already have two perfectly good shims to use! How convenient. (Note that I sometimes have to wedge some sandpaper between the shim and the frame to prevent it from sliding around.)
Once you have glued up the frame for the instrument, give yourself a pat on the back: one of the most important steps is finished. It’s (mostly) all downhill from here, except possibly for the final stringing, but more on that later.
From here, we’ll move on to attaching the back.