
So, you want to build a bowed psaltery? Great! But before we begin, I think it would be a good idea to learn all of the names and terms used for all the parts. This will help clear up any confusion and ensure that you know exactly what I’m referring to when I mention something during the building phase. So, to aid in this, I’ve made an anatomy chart with nearly all the parts labeled and described. Take a look:
Anatomy of the Bowed Psaltery:
|
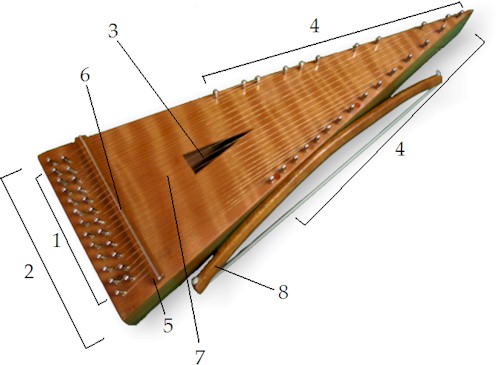
1. Tuning Pins – the pins located at the base of the psaltery. These are the pins that are tightened and loosened to tune the strings. Unlike the hitch pins, these pins are set into a special hardwood pinblock to help ensure that they won’t slip or lose their tuning easily. 2. Pinblock (aka wrest plank) – technically the pinblock isn’t fully visible in this picture, but is underneath the soundboard. The pinblock is a piece of strong and fine-grained wood (usually hard maple) that holds all of the tuning pins in place. 3. Soundhole – an opening, of many various shapes or sizes, in the top of the soundboard. Where the sound comes out! Think of the soundhole as the mouth of the instrument. 4. Hitch pins – the pins located along the sides of the psaltery. These pins anchor the strings to the instrument and elevate them above the soundboard. Notes are played by running the bow in between these pins. |
5. Bridge – the piece of wood that runs perpendicular across the top of the psaltery. This is the point where the vibrations of the strings are transferred to the instrument’s soundboard. 6. Saddle – a piece of metal or hard plastic that runs along the top of the bridge. The saddle’s job is to keep the strings from gouging into the wood of the bridge. 7. Soundboard – a thin piece of wood, (usually a quartersawn softwood), that makes up the top of the bowed psaltery. This piece is responsible for transferring the strings’ vibrations to the rest of the psaltery. 8. Bow – a simple hardwood bow is pictured above. Bows can be of any number of shapes or sizes. What puts the bowed in bowed psaltery.
|
|
Items not labeled/included – For clarity’s sake, I have left some items in the picture unlabeled. In addition, some features are not present on this particular bowed psaltery. These following items are described below. Strings (unlabeled) – somewhat self explanatory. Each string wraps overtop the hitch pin, runs across the top of the bridge, and is wound around a corresponding tuning pin at the base of the instrument. Sides (unlabeled) – along with the pinblock, the sides make up the actual frame of the psaltery. The sides also hold the hitch pins in place. Because the hitch pins are stationary, the sides can be made out of a variety of woods. Back (not pictured) – like the soundboard, the back is also a thin piece of wood. But unlike the soundboard, the back’s job is to reverberate the string’s vibrations. Think of the back as a tuning fork of sorts. Rose or Rosette (not included) – any sort of decoration within or around the soundhole. Typically, if it is a pattern or carving inside the soundhole, it is considered arose; and anything that is inlaid around the soundhole is a rosette. This psaltery has no rose or rosette. Binding (not included) – the wood trim that runs along the border of the top and/or back of the psaltery. The binding is used to protect the soft edges of the soundboard from dents and dings, as well as seal the end-grain of the wood on the soundboard and back. This psaltery has no binding. |
|
Now that you’ve got some idea of what all the parts do, and how they come together and interact to make this musical instrument, it’s time to take a look at just what we are undertaking to do. Remember, you can always come back to this page if you forget what something is called.
What we are building is a 25-string bowed psaltery, with a fully chromatic range of just over 2 octaves. By chromatic, I mean that each string goes up in half-step intervals, so we will be able to play all of the sharps and flats in addition to all of the natural notes within the two octaves. In addition to the actual building, I will also cover the stringing, as well as making a bow for the instrument too.
The first order of business is to find all of the tools and supplies that we will need to make this project a success. Good luck!