
Hi, I’m Eric Meier. I build bowed psalteries, and I thought I would share some of my building experience with you. I’ve designed an online project which walks you through the entire process of building this musical instrument—from start to finish.
Why am I sharing all of this online with you? Because you’ve got to hear this wonderful instrument in person! It seems that many musical instrument plans consist of an eclectic mix of cardboard, Styrofoam, and celery (?) – but not this one! When you are done, you will have a real, enjoyable, playable, and amazing musical instrument. (And your repertoire will not be limited to the four notes of ‘Mary Had a Little Lamb’ either…)
Let me show you what this instrument looks like:
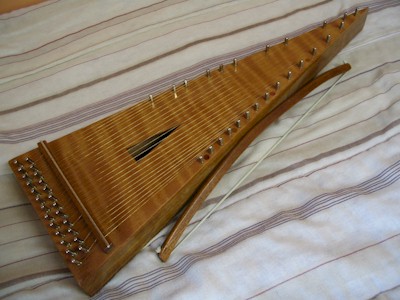
What’s not to like about the bowed psaltery? They have the most wonderful ringing sound of any musical instrument that I’ve ever heard, with a haunting sustain that makes the music seemingly float in midair and tingle in your ears. They are easy to play, and in their most basic form are fairly simple to build. So…
WELCOME
…to the wonderful of bowed psalteries, that is! That little phrase in the above paragraph sums up the foundation of this online project: simple to build. As with any instrument, the bowed psaltery can be as simple or extravagant as you want to make it. While the instruments that I build for Phantasy Psalteries are a bit more involved, on this website I’ve created a plan for a simple psaltery. By changing the layout and the shape to a basic triangle, and eliminating some of the more intricate steps – along with giving in-depth and thorough directions – I hope to make bowed psalteries available for just about everyone to build.
And as an encouragement, you can even view a gallery of finished psalteries made by others using the instructions given on this website.
Everything you need to know to build a bowed psaltery can be found here!
I had the pleasure of building one of these psaltries and I found the information provided in this website to be of great value. I was greatly impressed how well the author explained the reasoning behind his choices and how your choices will affect the psaltry. I learned a great deal from thi experience. Thanks so much.
Ahoy, I’ve been woodworking for 30 years. Most of my work is 18th century reproductions using period tools and technique. I used your instructions and the psaltery I’ve played for years to make this beautifully haunting instrument. I live in Florida, so I used local woods. Orange wood (the fruit wood, not Osage orange.) Was used on the back and block. Cypresswood was used on the top. I had a piece of red South American heartwood I used for the bridge. Used cherry and white horse hair for the bow. The sound is absolutely haunting. I wouldn’t call it a… Read more »
Oh, I forgot to add that I finished using a French polish. Although beautiful and very traditional for musical instruments, I would recommend a lot of practice before trying it. Thanks again!
I wonder if i could make a baritone in the same manner?
Great information